Avo Codegen in TypeScript
This page documents the single-file TypeScript output. Avo can also emit TypeScript in a “library” shape that splits the runtime from per-source types and a codegen-bound config file — see Library codegen.
Platforms
Avo can code generate Avo Codegen in TypeScript targeted at the following platforms
- Web
- React Native
- Node.js
Quickstart
Avo Codegen usage consists of 4 steps.
Step 1. Include the Avo file
Pull the generated code with the Avo CLI
To get the Avo generated TypeScript file you must be a member of an Avo workspace with a TypeScript source. Ask for an invite from a colleague or create a new workspace
npm install -g avo
avo login
avo pull --branch my-branch-nameLearn more about the CLI here.
You can also download the file manually from your Avo workspace.
Step 2. Initialize Avo
Import Avo from the generated file and initialize it by calling the initAvo method before tracking
import Avo from './Avo';

Avo.initAvo(
  { env: Avo.AvoEnv.Dev },
  /*, other parameters depending on your tracking plan setup*/
);
The actual parameters depend on your tracking plan setup, see the parameters explanation in the reference below.
Step 3. Call Avo Codegen to track your product usage
Every event in your tracking plan, marked with the “Implement with Codegen” checkbox, gets a function in the generated code, named according to the event name, in camelCase.
For example, if you have a “Signup Start” event defined like this in Avo:
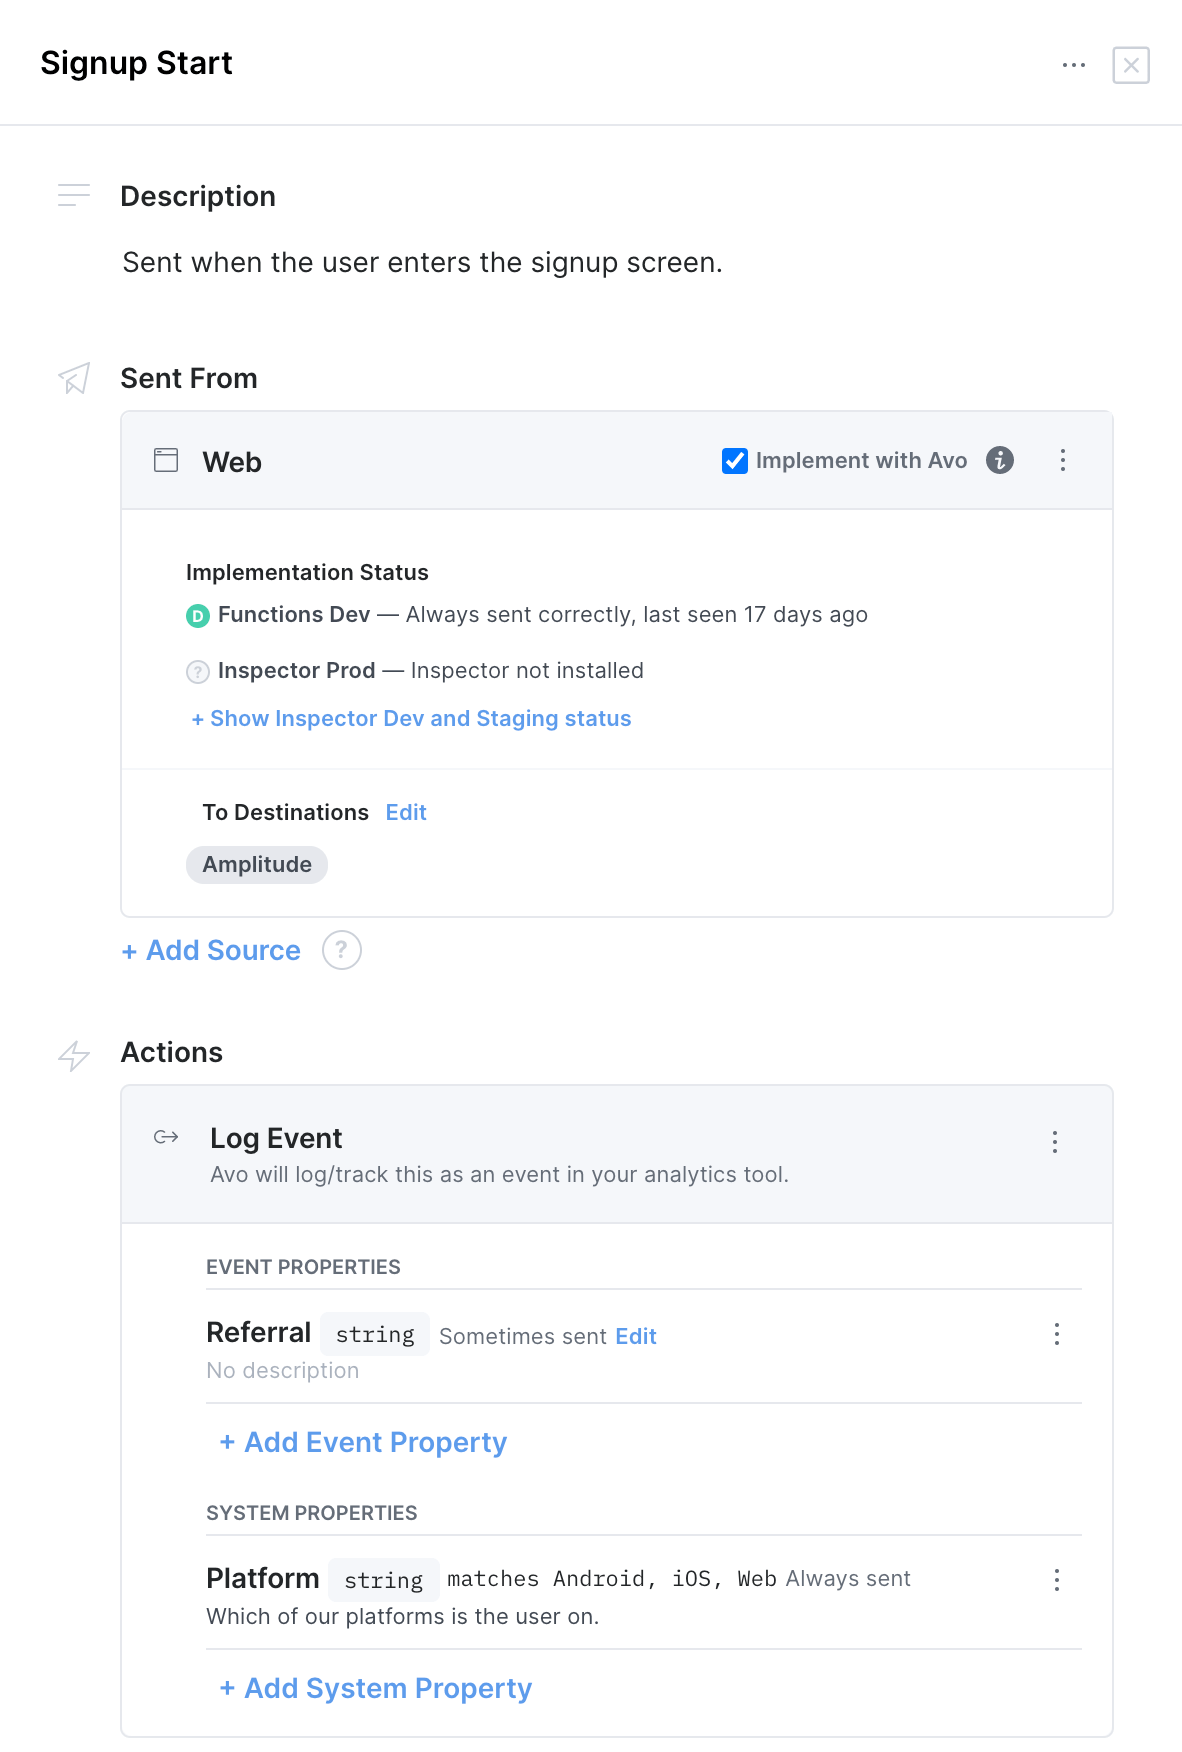
You’ll be able to call it like this from the generated code
Avo.signupStart({ referral: 'direct' });Notice, that you are not passing the System property with the call. System properties are defined on the init step and then automatically included with all events. You can update the system properties with
setSystemPropertiesfunction.
Web + TypeScript: Generate one file per event
For Web sources using TypeScript you can enable a source setting that generates one file per event to improve tree‑shaking and reduce bundle size.
- Availability: Web + TypeScript only
- Default: Off
- Where to enable: Source → Avo Codegen Setup → “Generate one file per event”
When enabled, the generated output is split into one file per event. You still initialize Avo from Avo.ts; event functions are imported from AvoEvents.
This section describes one-file-per-event for the standard (non-library) output mode. The same setting can also be combined with TypeScript library mode — see that page for the library-mode file layout.
Folder structure
Before
└─ Avo.ts               # everything in one file

After
├─ Avo.ts               # initAvo, validations, shared/runtime code
└─ AvoEvents/
   ├─ index.ts
   ├─ types.ts
   ├─ AppOpened.ts
   └─ ...               # one file per event
Migration steps
- Turn on the setting for your Web + TypeScript source and re‑generate (
avo pull). - Keep initializing Avo from
Avo.ts. - Update event call sites to import from
AvoEvents.
Before
import Avo from './Avo';

Avo.emailUpdate({ /* props */ });
After
import Avo from './Avo';
import { emailUpdate } from './AvoEvents';

Avo.initAvo(/* ... */);
emailUpdate({ /* props */ });
Reference details
AvoEvents/index.tsre‑exports the per‑event default exports as named exports:
export { default as signupStart } from './signupStart';
export { default as passwordUpdate } from './passwordUpdate';
export { default as signupComplete } from './signupComplete';
export { default as msgReceived } from './msgReceived';
export { default as emailUpdate } from './emailUpdate';AvoEvents/types.tsexposes shared types used by the per‑event modules:
export interface AvoEventsModuleMap {
  signupStart: typeof import('./signupStart').default;
  passwordUpdate: typeof import('./passwordUpdate').default;
  signupComplete: typeof import('./signupComplete').default;
  msgReceived: typeof import('./msgReceived').default;
  emailUpdate: typeof import('./emailUpdate').default;
}
export type EventName = keyof AvoEventsModuleMap;
export type EventFn<T extends EventName = EventName> = AvoEventsModuleMap[T];
Step 4. Verify the implementation
Use the Implementation status in your Avo workspace and the visual debuggers to verify that your implementation is correct.
Reference
initAvo
Avo.initAvo(
  options: {
    env: AvoEnv;
    webDebugger?: boolean;
    strict?: boolean;
    noop?: boolean;
    reportFailureAs?: 'error' | 'warn' | 'log';
    inspector?: AvoInspector;
    avoLogger?: AvoLogger;
  },
  systemProperties?: {
    systemProperty0: number;
    systemProperty1: boolean;
    ...},
  destinationOptions?: any,
  interfaceDestination?: CustomDestination,
  otherInterfaceDestination?: CustomDestination,
  ...Destination?: CustomDestination
Initializes Avo, needs to be called before the tracking methods.
This method will call the make(env) callback in all the provided destination interfaces. It will also initialize the analytics SDKs of the legacy Avo Managed destinations.
Arguments
options: {env, [noop], [strict], [avoLogger], [inspector], [mobileDebugger]}
env: AvoEnv, can be set to dev, prod and staging.- `[webDebugger]: optional bool, for optional Avo Web Debugger instance
[strict = true]: bool defaulting to true, if true, Avo will throw an exception when it detects a tracking problem in development or staging. Note that the strict flag is ignored in production.[noop = false]: bool defaulting to false, if true, Avo won’t make any network calls (no tracking) in development and staging environments. Note that the noop flag is ignored in production.- `[reportFailureAs]: optional, can be set to error, warn and log. Decides the log level of reports for failures.
[inspector]: optional Avo Inspector instance. If you use Avo Inspector pass it here to make Avo Codegen automatically report the invocations to Avo Inspector.[avoLogger]: optional custom implementation of the logger. Can be used to disable logs. Find the code snippet here.
systemProperties: an object where each field represents a system property in your tracking plan.
When you define system properties in your Avo workspace you set name and type - the fields of this object are named the same as system properties, in camelCase, and you should provide corresponding types, can be string, int, long, float, bool, array, object and any.
destinationOptions: {[segmentDestinationName], [anotherSegmentDestinationName], [amplitudeDestinationName], [mixpanelDestinationName]}. Keys of this objects are the camelCase versions of your destinations in the Avo UI.
mixpanelDestinationName: optional object, if you use Mixpanel destination managed by Avo, this object will be passed tomixpanel.init(apiKey, options)as the second parameter,optionsamplitudeDestinationName: optional object, if you use Amplitude destination managed by Avo, this object will be passed toamplitude.init(apiKey, null, options)as the third parameter,optionssegmentDestinationName: optional object, if you use Segment destination managed by Avo, this object will be passed toanalytics.load(apiKey, options)as the second parameter,options
destination: CustomDestination, each destination you are sending events to gets a separate parameter in the init function with hooks that the Avo generated code will trigger, unless you are using the legacy Avo managed destinations. Each method in the destination interface is directly mapped to the Actions attached to each event in Avo. Learn more about event Actions in this doc.
Custom destination interface format:
{
  make?: function (env: AvoEnv): void, // This method is optional, you can skip it if you've already initialized your Analytics SDK
  logEvent?: function (eventName: string, eventProperties: object): void,
  setUserProperties?: function (userId: string, userProperties: object): void,
  identify?: function (userId: string): void,
  unidentify?: function (): void,
  logPage?: function (pageName: string, eventProperties: object): void
  revenue?: function (amount: number, eventProperties: object): void

  // The following methods are used for group analytics and are not required. Learn more about group analytics [here](/data-design/groups)
  setGroupProperties?: function(groupType: string, groupId: string, groupProperties: object),
  addCurrentUserToGroup?: function(groupType: string, groupId: string, groupProperties: object),
  logEventWithGroups?: function(eventName: string, eventProperties: object, groupTypesToGroupIds: object)
};
In Node each callback is asynchronous and gets an additional first parameter - userId and, optionally, a anonymousId parameter. To get the anonymousId parameter in your workspace reach out to us.
Destination interface example: Mixpanel
# Example: Destination interface for the Mixpanel SDK. Replace the Mixpanel implementation with your own tracking SDK methods
let customDestination = {
  make: function (env: AvoEnv, apiKey: string) {
    mixpanel.getInstance().init(apiKey);
  },
  logEvent: function (eventName: string, eventProperties: object) {
    mixpanel.getInstance().track(eventName, eventProperties);
  },
  setUserProperties: function (userId: string, userProperties: object) {
    mixpanel.getInstance().people.set(userProperties);
  },
  identify: function (userId: string) {
    mixpanel.getInstance().identify(userId);
  },
  unidentify: function () {
    mixpanel.getInstance().reset();
  },
  logPage: function (pageName: string, eventProperties: object) {
    mixpanel.track("Page Viewed", eventProperties.assign({"pageName": pageName}));
  },
  revenue: function (amount: number, eventProperties: object) {
    mixpanel.getInstance().people.track_charge(amount, eventProperties);
  },
  // The following methods are used for group analytics and are not required. Learn more about group analytics [here](/data-design/groups)
  setGroupProperties(
    groupType: string,
    groupId: string,
    groupProperties: object,
  ) {
    // Mixpanel example
    mixpanel.get_group(groupType, groupId).set(groupProperties);
    // Amplitude example
    var identify = new amplitude.Identify().set(groupProperties);
    amplitude.groupIdentify(groupType, groupId, identify);
  },
  addCurrentUserToGroup: function (
    groupType: string,
    groupId: string,
    groupProperties: object,
  ) {
    // Segment example
    analytics.group(groupType, {
      name: groupId,
      ...groupProperties,
    });
    // Mixpanel example
    mixpanel.set_group(groupType, groupId);
    mixpanel.get_group(groupType, groupId).set(groupProperties);
    // Amplitude example
    amplitude.getInstance().setGroup(groupType, groupId);
    var identify = new amplitude.Identify().set(groupProperties);
    amplitude.groupIdentify(groupType, groupId, identify);
  },
  logEventWithGroups: function (
    eventName: string,
    eventProperties: object,
    groupTypesToGroupIds: object,
  ) {
    // Mixpanel example
    mixpanel.track_with_groups(eventName, eventProperties, groupTypesToGroupIds);
    // Amplitude example
    amplitude
      .getInstance()
      .logEventWithGroups(eventName, eventProperties, groupTypesToGroupIds);
  },
};
Destination interface example: Segment
# Example: Destination interface for the Segment SDK. Replace the Segment implementation with your own tracking SDK methods
let customDestination = {
  make: function (env: AvoEnv, apiKey: string) {
    analytics.load(apiKey)
  },
  logEvent: function (eventName: string, eventProperties: object) {
    analytics.track(eventName, eventProperties)
  },
  setUserProperties: function (userId: string, userProperties: object) {
    analytics.identify(userId, userProperties);
  },
  identify: function (userId: string) {
    analytics.identify(userId);
  },
  unidentify: function () {
    analytics.identify(null);
  },
  logPage: function (pageName: string, eventProperties: object) {
    analytics.page(eventProperties.assign({"pageName": pageName}));
  },
  revenue: function (amount: number, eventProperties: object) {
    analytics.track("Purchase Complete", eventProperties.assign({"revenue": amount}))
  },
  // The following methods are used for group analytics and are not required. Learn more about group analytics [here](/data-design/groups)
  setGroupProperties(
    groupType: string,
    groupId: string,
    groupProperties: object,
  ) {
    analytics.group(groupId, groupProperties);
  },
  addCurrentUserToGroup: function (
    groupType: string,
    groupId: string,
  ) {
    analytics.group(groupId)
  },
  logEventWithGroups: function (
    eventName: string,
    eventProperties: object,
    groupTypesToGroupIds: object,
  ) {
    // Not supported by the Segment SDK
  },
};
Find destination interface snippets for different platforms and analytics destinations in our GitHub.
Read more about the destination interface here.
setAvoLogger
Avo.setAvoLogger(avoLogger);This method allows you to provide custom implementation of the logger used by Avo Codegen, same as the avoLogger parameter in the initAvo call.
Can for example be used to disable logs or change which logging method is used.
Arguments
avoLogger: custom implementation of the logger. Find the code snippet here.
setSystemProperties
Avo.setSystemProperties(systemProperties);A method to update system properties. If you provide undefined values here corresponding properties won’t be updated
Arguments
systemProperties: an object where each field represents a system property in your tracking plan.
When you define system properties in your Avo workspace you set name and type - the fields of this object are named the same as system properties, in camelCase, and you should provide corresponding types.
Event tracking functions
Avo.yourEventName(properties: { [eventProperty0], [eventProperty1], ..., [userProperty0], [userProperty1], ..., [groupType0GroupId], [groupType1GroupId], ..., [groupProperty0], [groupProperty1], ..., [userId_], [anonymousId_], [segmentContext_] })Every event you define in your tracking plan in Avo gets a function named after the event in camelCase. The arguments of the function depend on how it’s defined in your tracking plan
Arguments
eventProperty: type defined in the Avo tracking plan, can be string, int, long, float, bool, array, object and any.
Every event property attached to the event in the Avo UI gets a corresponding argument.
The argument key is camelCase version of the property name defined in the Avo UI.
Pass the value of the property to track here.
userProperty: type defined in the Avo tracking plan, can be string, int, long, float, bool, array, object and any.
Every user property attached to the event in the Avo UI gets a corresponding argument.
The argument key is camelCase version of the property name defined in the Avo UI.
Pass the value of the property to update here.
groupTypeGroupId: string, if this event has group type attached in the UI, you’ll provide the group id here.
The argument key is camelCase version of the group type defined in the Avo UI with the “GroupId” suffix.
E.g. if the event has “company” group type, the property will be celled “companyGroupId” and you would provide the company name.
groupProperty: type defined in the Avo tracking plan, can be string, int, long, float, bool, array, object and any.
Every group property attached to the event in the Avo UI with the “Group Update” action gets a corresponding argument.
The argument key is camelCase version of the property name defined in the Avo UI.
Pass the value of the property to update here.
userId_: string, used to connect event to specific user
Web and React Native: Added if the event has the Identify User action
Node.js: added to all events, you have to either provide it or the anonymousId_
Additional arguments
anonymousId_: string, Node.js only, this argument is automatically added if corresponding setting is enabled, used to track anonymous users
segmentContext_: object, Node.js only, passed down to Segment as the Segment context, e.g. segment.track({..., context: context})
Snowplow interface
Snowplow SDK’s tracking interface is a little different from the common event tracking libraries and working with Snowplow through Avo is slightly different too.
If you add a snowplow destination to a JavaScript source you’ll need to provide the following object as
options[snowplowDestination];You’ll implement it like this:
const snowplowDestination = {
  make: function (env: string) {
    // Optional: You can initialize Snowplow here or leave empty if initialized elsewhere.
    // Your custom Snowplow initialization, that includes the `newTracker` call
    // newTracker('sp1', '{{collector_url}}', { appId: 'my-app-id', plugins: [] });
    // Learn more: https://docs.snowplow.io/docs/sources/web-trackers/
  },
  trackSelfDescribingEvent: (
    schema: string,
    data: any,
    contexts: any[],
  ): void => {
    trackSelfDescribingEvent({
      event: {
        schema: schema,
        data: data,
      },
      context: contexts,
    });
    // Learn more: https://docs.snowplow.io/docs/sources/web-trackers/custom-tracking-using-schemas/
  },
  trackPageView: (title: string): void => {
    trackPageView(title);
    // Learn more: https://docs.snowplow.io/docs/sources/web-trackers/custom-tracking-using-schemas/
  },
  identify: (userId: string): void => {
    setUserId(userId);
    // Learn more: https://docs.snowplow.io/docs/sources/web-trackers/custom-tracking-using-schemas/
  },
  unidentify: (): void => {
    clearUserData();
    // Learn more: https://docs.snowplow.io/docs/sources/web-trackers/custom-tracking-using-schemas/
  },
};
Destinations
You can send your data using the Avo generated TypeScript code to any data destination that accepts custom events, including:
- Amplitude
- FacebookAnalytics
- FullStory
- Mixpanel
- Mixpanel
- Permutive
- Segment
- Snowplow
- ZendeskConnect
- Adobe Analytics
- Apptelemetry
- RudderStack
- Freshpaint
- PostHog
- Google Analytics 4 / Firebase Analytics
- Heap
- Keen
- Kissmetrics
- LaunchDarkly Events
- Pendo
- Fivetran
- AppsFlyer
- Braze
- Intercom
- A home made SDK
- Internal API