Inspector Issues View
What is the Inspector issues view and what information it contains
The inspector issues view is one of three Inspector views, the other two are the Debugger and the Events view.
The Inspector issues is particularly useful for reviewing and managing tracking plan violations in your production data for the past 24 hours. This view allows you to sort and filter issues to uncover those relevant to you and gives you the overview and information needed to prioritize which of them to act on.
If you are looking to validate your tracking implementation in real-time, use the Debugger.

Each issue in the table represents an issue on a particular event, or a particular property contained within an event. In the table you will see:
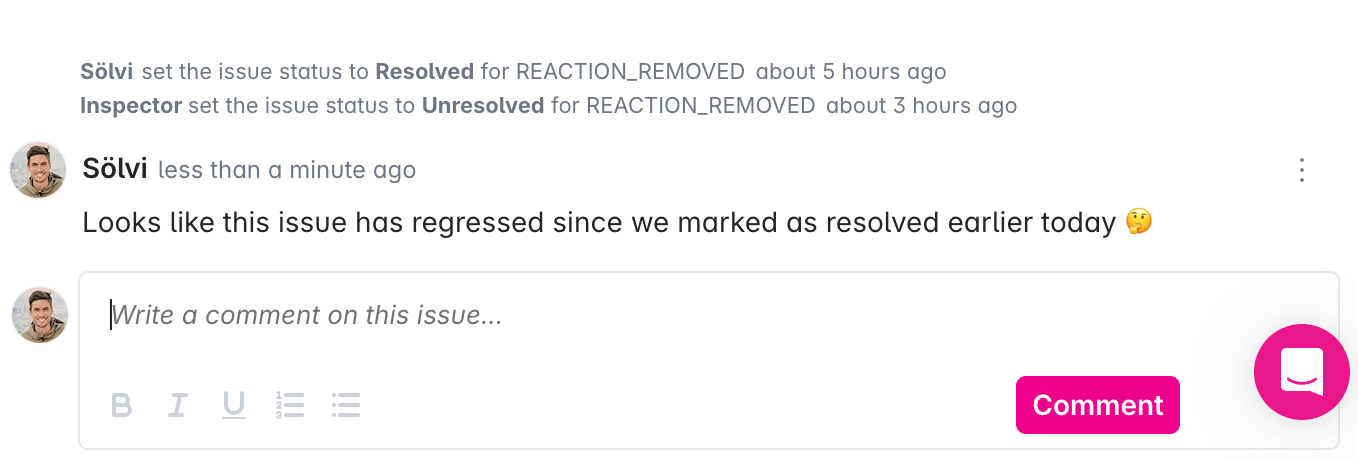
- Regression - If you’ve marked an issue as resolved and it has reappeared, it will be marked as a regression
- The issue type – for example, unexpected event or inconsistent property types; you can see the (full list of issue types in Inspector here)
- The name of the event and/or property impacted
- The source impacted; each impacted source will be flagged individually
- Issue timing – when it was first and last seen
- First seen – when the issue was first seen
- Last seen – when the issue was seen most recently
- Event volume – how many total instances of the event were seen
- Issue volume – how many instances of the event were seen with this issue
- Impacted releases – which release versions were impacted by the issue, sorted by the most recent release first
- Issue percentage – the proportion of events seen with this issue in relation to total event volume (issue volume / event volume)
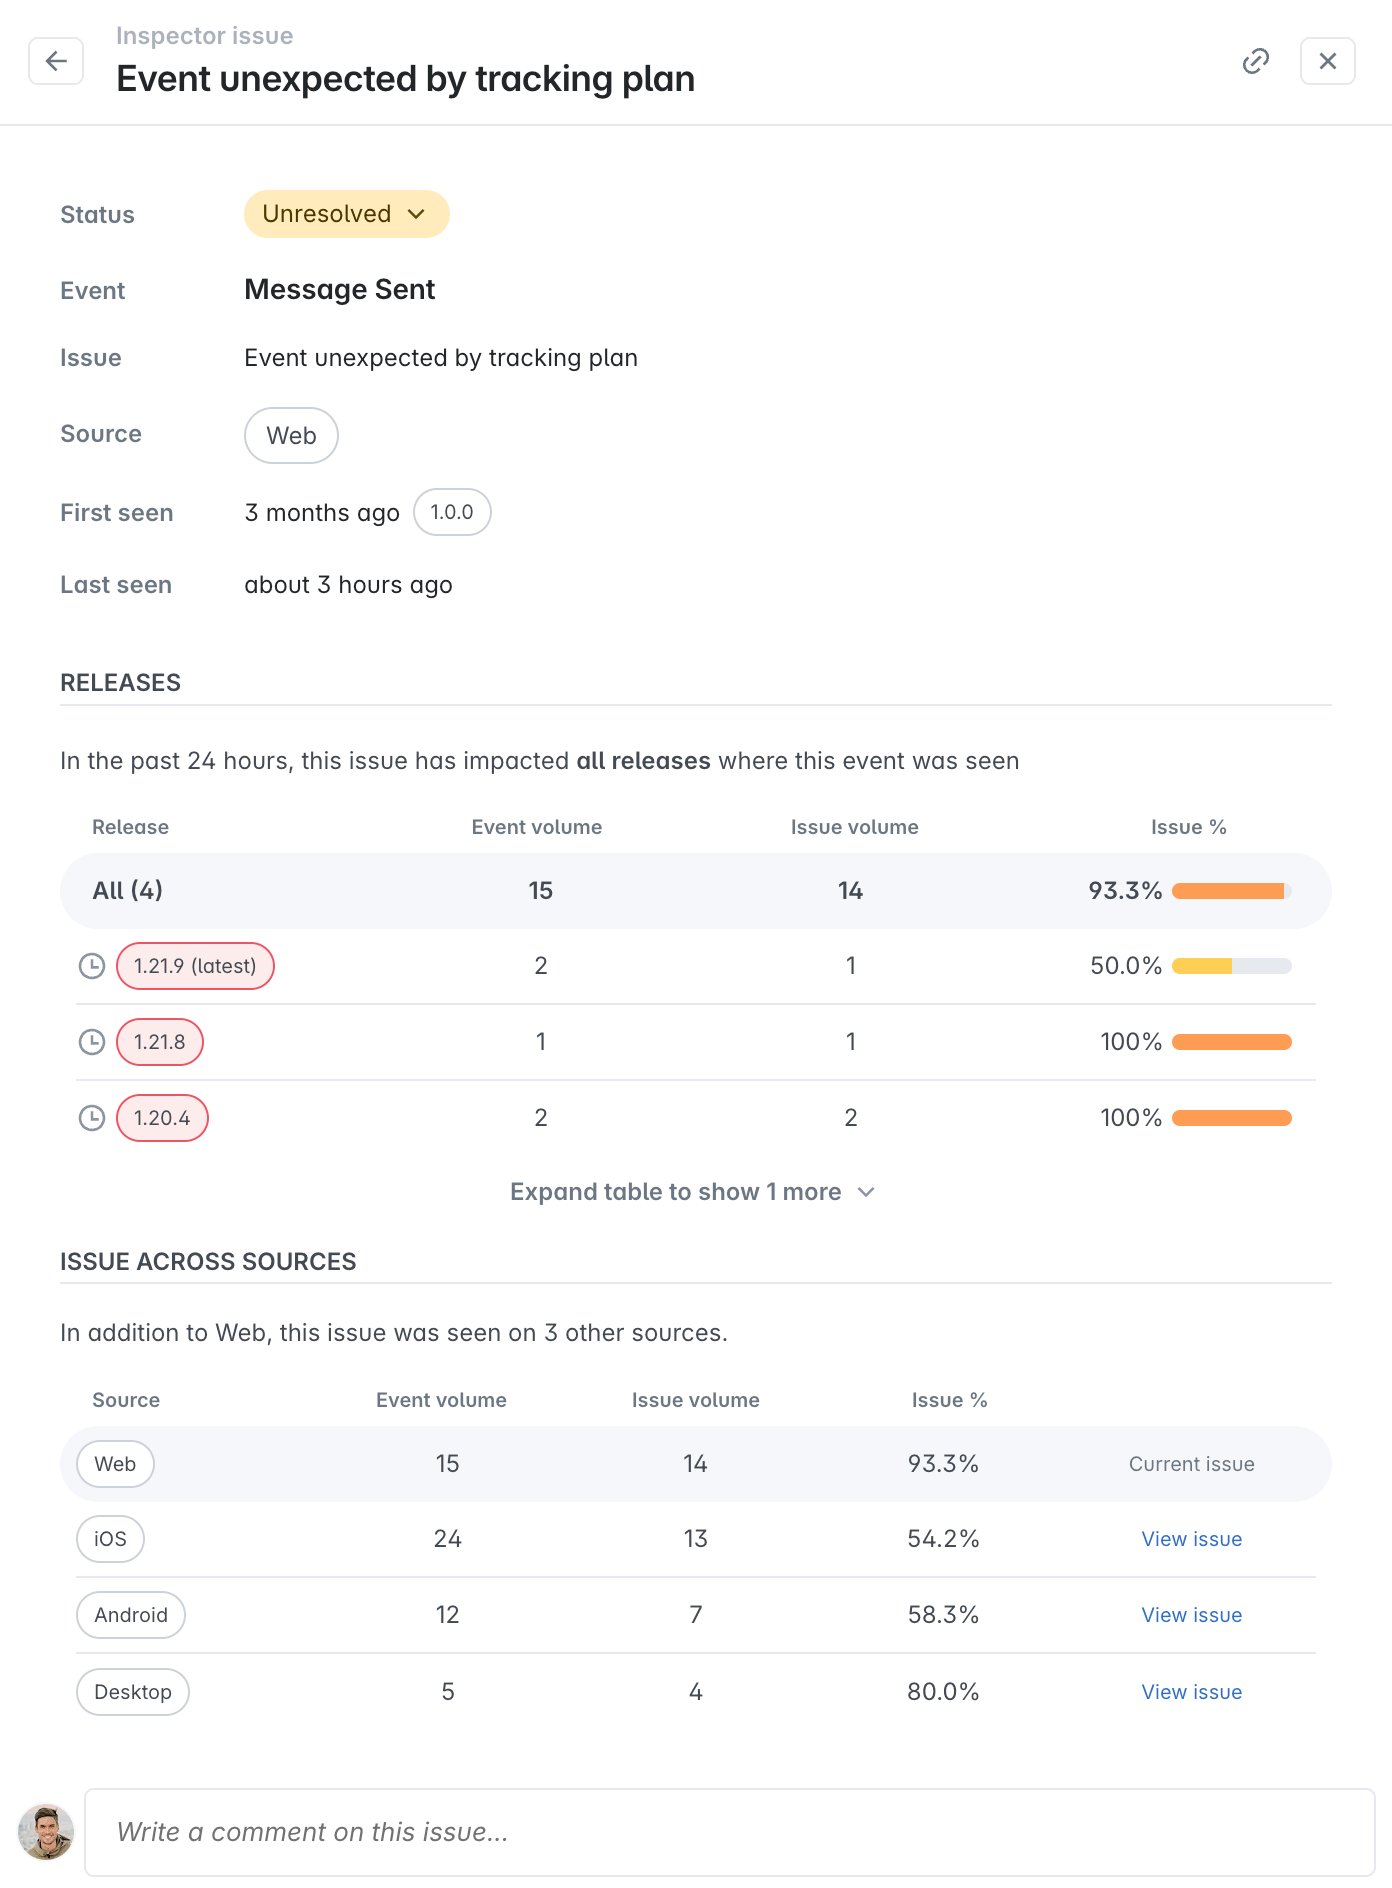
Issue details
Click any issue in the list to see more details. If you have multiple sources connected with Inspector, you can dig into which sources are impacted by the issue and uncover which sources are most severely affected.
Issue status
Set the status of an issue to communicate its current status to your team. The status can be set to one of the following:
- Unresolved: The default status for new issues. This status indicates that the issue has not been investigated.
- Ignore: If you know you’re not planning to fix an issue, you can set the status to ignore. This help you focus on those issues on which you want to act.
- Resolved: If you have looked into the issue and fixed it, you can set the status to resolved. If the issue reappears, it will be marked as a regression. If you have alerts enabled for a saved view with a resolved issue, you will be notified when the issue reappears.
Bulk status management
You can efficiently manage the status of multiple issues at once using bulk actions:
- Select multiple issues by checking the boxes next to the issues you want to manage
- Use the bulk action toolbar that appears at the bottom of the screen
- Choose your action:
- Ignore: Mark multiple issues as ignored
- Resolve in…: Mark multiple issues as resolved, specifying when they should be considered resolved:
- 1 hour from now
- 24 hours from now
This is particularly useful when you have multiple related issues that need the same resolution status, such as after deploying a fix that resolves several data quality issues at once. For detailed guidance on using bulk editing, see the bulk editing guide.
Event info
The event impacted by the issue, its volume and whether it is documented in your Avo tracking plan.
- If the event is not present in the tracking plan, click “Add to Tracking Plan” to instantly add it to your Tracking Plan.
- If the event is present in the tracking plan, click on the corresponding link to review and/or update its definition and details.
Property info
The property impacted by the issue, and whether it is documented to be sent with the event in your tracking plan.
- If the property is present on the event in your tracking plan, click on the corresponding link to review and/or update its definition and details.
Not all issues are related to properties. See the full list of issue types here.
Releases
In this section you can see each release impacted by the issue in the last 24 hours (sorted by the most recent release first) with the following:
- The release version; hover over the clock icon to see the release date for that particular release
- The event volume seen on that release in the past 24 hours
- The issue volume seen on that release in the past 24 hours
- The issue percentage seen on that release in the past 24 hours
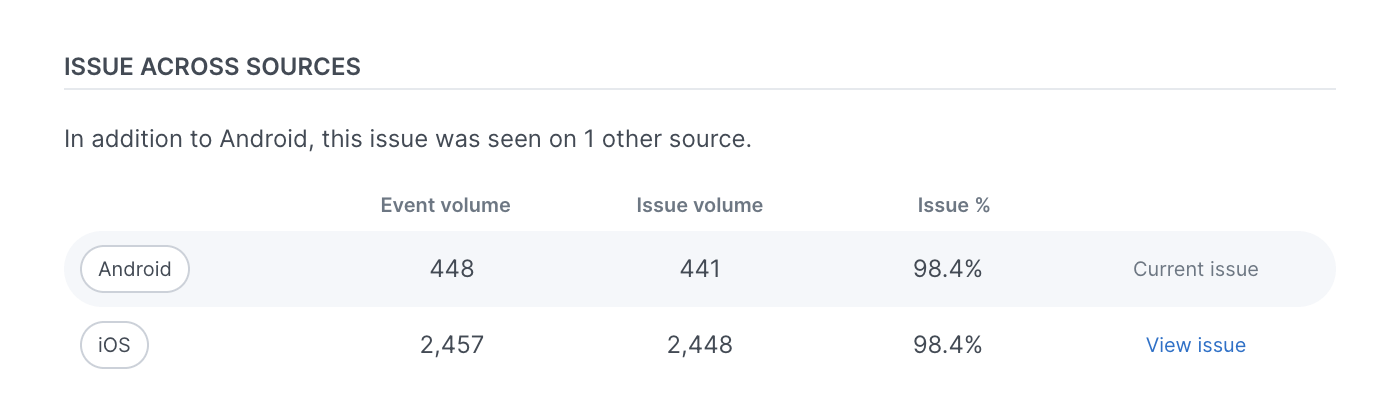
Issue across sources
At the bottom of your issue details, you will see a list of all sources impacted by the issue. For each source you will see:
- Event volume
- Issue volume
- Issue percentage
- A link to the issue details on each additional impacted source.
Activity log and comments
The activity log lives at the bottom of your issue details. The activity log includes the issue creation date and a breakdown of when someone changed the issue’s status or a regression happened. The Activity Log is a bit like commits in Github, where you can see time stamped changes and the team member who made the change. The activity log also includes your comments on that issue. With comments, you can communicate on a specific issue and tag your team members to weigh in on an issue you need to fix together.
Release and source breakdown
By clicking the “X releases on Y sources” button right above the issues table, you can see a breakdown of the releases seen in the past 24 hours and used to calculate the issues you’re looking at.

This breakdown can be helpful to understand which releases have been fully rolled out and which releases are still being rolled out. There may still be more issues to come for releases that are mid-rollout.
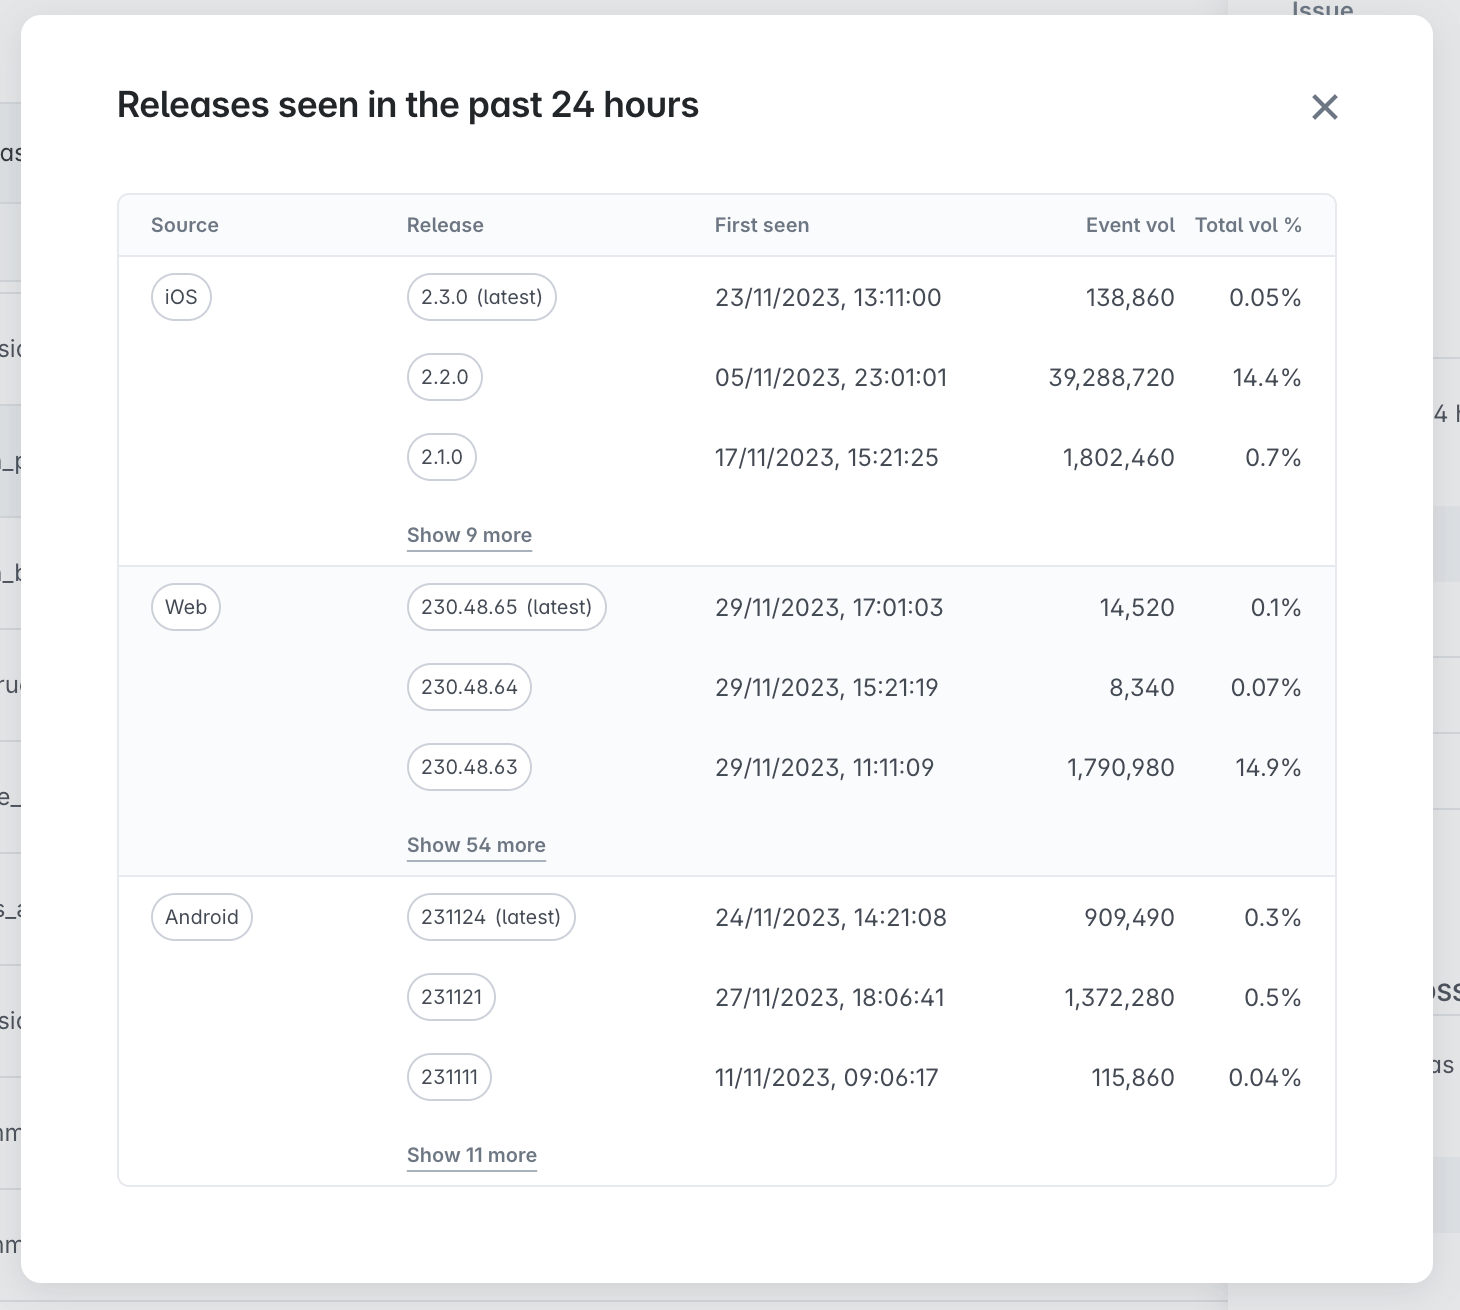
In the example above, Inspector has seen a very low volume of events from the latest release on iOS (2.3.0) compared to prior releases. This is a strong indication that the latest release has not been fully rolled out.
Troubleshooting
Why are there no issues in my issues view?
There are several reasons that may cause no issues to appear in your issues view, whether it’s for a specific source or overall.
Inspector not installed on source
The most obvious reason is that you have not yet installed Inspector at all, or on the source that you are looking for. install Inspector on the source for which you’d like to see issues.
Inspector not installed on production
The issues view currently only displays issues from the past 24 hours in production. That means that if you don’t have Inspector installed for production on any given source, you won’t see any issues in the Issues view. Install Inspector on production for the source for which you’d like to see issues.
No issues in production for the past 24 hours
The issues view currently only displays issues from the past 24 hours in production. That means that if you don’t have any issues in the past 24 hours, then you won’t see any issues. Yay!
What’s next?
Now that you have issues in your issues view, you can start learning about the issue types, finding issues that are important to you and fixing issues to systematically getting to better data, one resolved issue at a time. You can also start building your tracking plan by importing events from Inspector into you Avo tracking plan.
