Plan analytics update in Avo branch
1.1 Decide what to track
Role: Product or Data (This initiative is usually led by a product oriented person)
The hardest part in the whole analytics release process is usually to decide what events and properties you need, to be able to measure the success of the product change. There are many paths to a decision, but no matter which one you take, we recommend doing it as early as possible in the development process.
We always recommend starting by formulating the metrics you hope to move with your change. Our favorite way to do this is what we like to call a Purpose Meeting, centered around the user journey for your feature. The outcomes of that meeting are:
- Goals – what does success look like?
- Metrics – how will we measure how successful we are?
- Journey – what are the most important user actions and steps in this journey?
The result of the purpose meeting is usually a draft of the user journey with key actions identified that someone takes forward to the next step.
1.2 Create a branch in Avo
Role: Product or Data. (This is also sometimes done by engineering, particularly when the engineering team is product driven.)
The first thing you do in Avo, for a product release, is to create a new branch.
A branch allows you to draft changes to the tracking plan in isolation, without impacting the main branch, which contains the single source of truth of what’s currently being tracked.
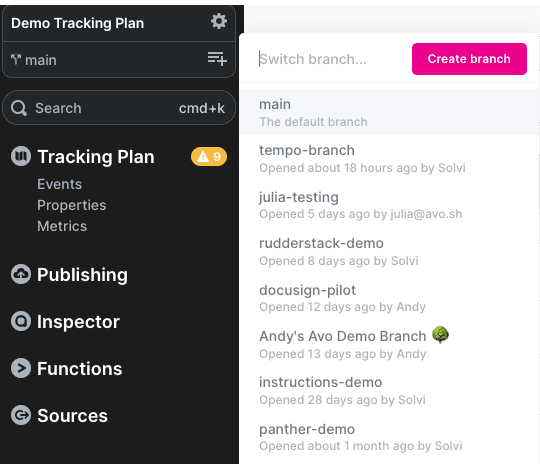
To create a new branch, first make sure you are on the main branch. You can see the name of the branch you’re currently on under your workspace name in the branch sidebar. Right next to the name of the branch, you can click the plus icon and there you can create a new branch as shown on the screenshot below.
Name your branch in a way that helps your team mates know what the branch is about. We recommend the branch name references the product update or feature it’s connected to in some way. Some teams also like including a reference to the team involved in the change and/or a ticket number from their task management system. You can always rename the branch later in the Branch context tab of the review screen.
Example: Creating a branch
1.3 Design the journey in the journey builder
Role: Product or Data
Once you have an idea of what to track, you start designing the journey visually on your branch in Avo using the journey builder. The journey builder transforms tracking plan creation from a documentation-heavy process to a visual, self-service workflow using product screenshots or designs to represent each step of your experience.
You can also document the goals and metrics from your purpose meeting in Avo. Learn more in our guide to use Categories and Metrics to document Purpose Meetings.
Creating a journey
The recommended workflow for creating a tracking plan is to create a journey in the journey builder, which will help you define the events and properties you need to track.
To create a journey, navigate to the Journeys tab in the left sidebar and click “Create Journey”. This opens the journey builder—a canvas where you’ll compose your user journey.
Here’s the recommended workflow:
- Add a name and description for the journey that captures the feature or flow you’re tracking
- Add journey steps by importing frames directly from Figma or by dragging and dropping screenshots onto the canvas. Order them to visualize the user journey and connect steps to each other so AI can generate more relevant triggers
- Annotate images to highlight specific areas you want to track. Press
tto activate trigger mode, then click to create a dot annotation (for buttons) or click and drag to create a rectangle annotation (for larger areas like carousels) - Add triggers for each user action. Either use AI-powered suggestions to analyze your screenshots, or create triggers manually by dragging from an annotation or journey step handle
- Connect triggers to events by linking each trigger to existing events in your tracking plan or creating new ones. AI can suggest existing events and variants to help prevent duplicates
- Add property conditions to define which properties are important for each trigger and specify any required values for that scenario
Example: Creating a journey in the journey builder
Tips for journey design
- Reuse existing events - Check for existing events that match your triggers using AI suggestions or the command palette (cmd+k on Mac, ctrl+k on Windows)
- Connect journey steps - Link steps together so AI can generate more contextually relevant triggers based on the flow
- Add descriptions - Document trigger details to keep transparency between those who design, implement and consume the data
- Use property conditions - Highlight important properties and their expected values for each scenario to make implementation clearer
For a comprehensive walkthrough of all journey builder features, see the Journeys documentation. For detailed documentation on tracking plan components:
- Branches - A branch of the tracking plan that allows you to update it in isolation from the main branch.
- Journeys - The recommended place to draft tracking plan updates, in context of the user journey.
- Metrics - Define measurable goals and KPIs
- Events - The data structure that captures the user actions and system events.
- Event Variants - A way to define variations of events to handle conditional event scenarios
- Properties - The metadata that describes the actions, systems and users involved in the events.
What’s next?
