Documenting Purpose Meetings in Avo
Using Journeys, Categories and Metrics
Stef, co-founder and CEO of Avo, wrote this great article about tracking the right product metrics. There she introduced the concept of the purpose meeting where different stakeholders of the feature or improvement being introduced align on how to measure the success of the change.
The outputs of the meeting are:
- Goals – what does success look like?
- Metrics – how will we measure how successful we are?
- Journey – what are the most important user actions and steps in this flow?
But how can you document the outcome of this meeting in context with your event definitions in Avo?
Option A: Using Journeys (recommended)
For product updates, whether they are new features or updates to existing ones, we recommend using Journeys to visually capture the purpose meeting outcomes. Journeys let you:
- Visualize the user flow with product screenshots or design mockups
- Identify key user actions by adding triggers to each step
- Connect to events and define property conditions for each scenario
- Use AI assistance to generate triggers and suggest existing events
- Document context and notes for the journey in the journey description
This approach transforms the purpose meeting from a documentation exercise into a visual, collaborative workflow where the entire team can see the user journey and tracking requirements in context.
Step 1 – Open a branch in Avo
We always recommend opening a branch before making any changes in Avo. That allows you to draft changes in isolation from the source of truth on the main branch and request reviews.
To create a new branch, click the branch name in the left side navigation bar (usually “main”) and then click the “Create Branch” button. Name your branch something descriptive that references the feature or product update.
Step 2 – Find or create the relevant journey
Navigate to the Journeys tab in the left sidebar. If a journey already exists for this feature, open it to continue building. Otherwise, click ”+ New Journey” to create a new one.
Give your journey a descriptive name that captures the user flow, such as “Checkout Flow” or “User Onboarding”.
Step 3 – Document goals and discussions in the journey description
In the journey details panel, add a description that captures the key outcomes from your purpose meeting:
- Goals – what does success look like for this feature?
- Metrics – how will you measure success?
- Context – links to product requirements, designs, or related discussions
This documentation lives alongside the visual journey, making it easy for anyone to understand the “why” behind the tracking requirements.
Step 4 – Add journey steps
Add journey steps to visualize the user flow:
- Drag and drop screenshots directly onto the canvas, or click ”+ Add Journey Step”
- Order the steps to match the user’s path through the experience
- Connect steps by dragging from one step to another to show the flow
- Add names and descriptions to each step for clarity
You can use product screenshots, design mockups, or no visuals at all—whatever best represents each step in the journey.
Step 5 – Add triggers with events
For each journey step, add triggers to define the user actions that should be tracked:
- Add a trigger by clicking the placeholder trigger below a step, or use AI to generate triggers based on the screenshot
- Name and describe the trigger to clearly communicate the user action (e.g., “Clicked Add to Cart”)
- Connect to an event by clicking “Connect event/variant” or use AI to suggest existing events from your tracking plan
- Add property conditions to highlight which property values are expected for this specific scenario
Once complete, your journey serves as a visual specification that product, data, and engineering teams can all review together. The triggers automatically appear in the connected event details, and the journey provides visual context for implementation.
For a full walkthrough of building journeys on the canvas, see Creating a journey.
Option B: Using Categories and Metrics
Alternatively, you can use a combination of categories and metrics to document the outcomes.
Step 1 – Open a branch in Avo
We always recommend opening a branch before making any changes in Avo. That allows you to draft changes in isolation from the source of truth on the main branch and request reviews.
Pro-tip: as an admin on your workspace, you can lock down your main branch. By doing this, you will create a historical log of all changes made via branch histories.
Example: Opening a branch
Step 2 – Find or create the relevant category
We recommend using categories to organize your metrics and events. Categories normally represent a feature, a set of related features or important user flows.
We recommend picking a single category to document the results from the purpose meeting. The feature or improvement that you are making could of course be related to more than one, so simply pick the one that you feel like is the most relevant one.
Example: Creating a category
Step 3 – Document your goals and discussions
Here you have the flexibility to format your goals and discussions as you like. We like to document important findings such as the topic of the meeting, the problem that the feature or improvement is addressing, and of course the goals.
Here’s an example of what we documented following a purpose meeting about our collaborators feature:

Example: Goals and discussions in category description field
Step 4 – Add your metrics
Define your metric in the category (you can also add it to other categories if you want!). Currently you can define four types of metrics: funnel, segmentation, proportion and retention. This will help you remember how you intended to structure your metric in your analytics platform later, and for other people to easily do it themselves. We love self-serve analytics culture!
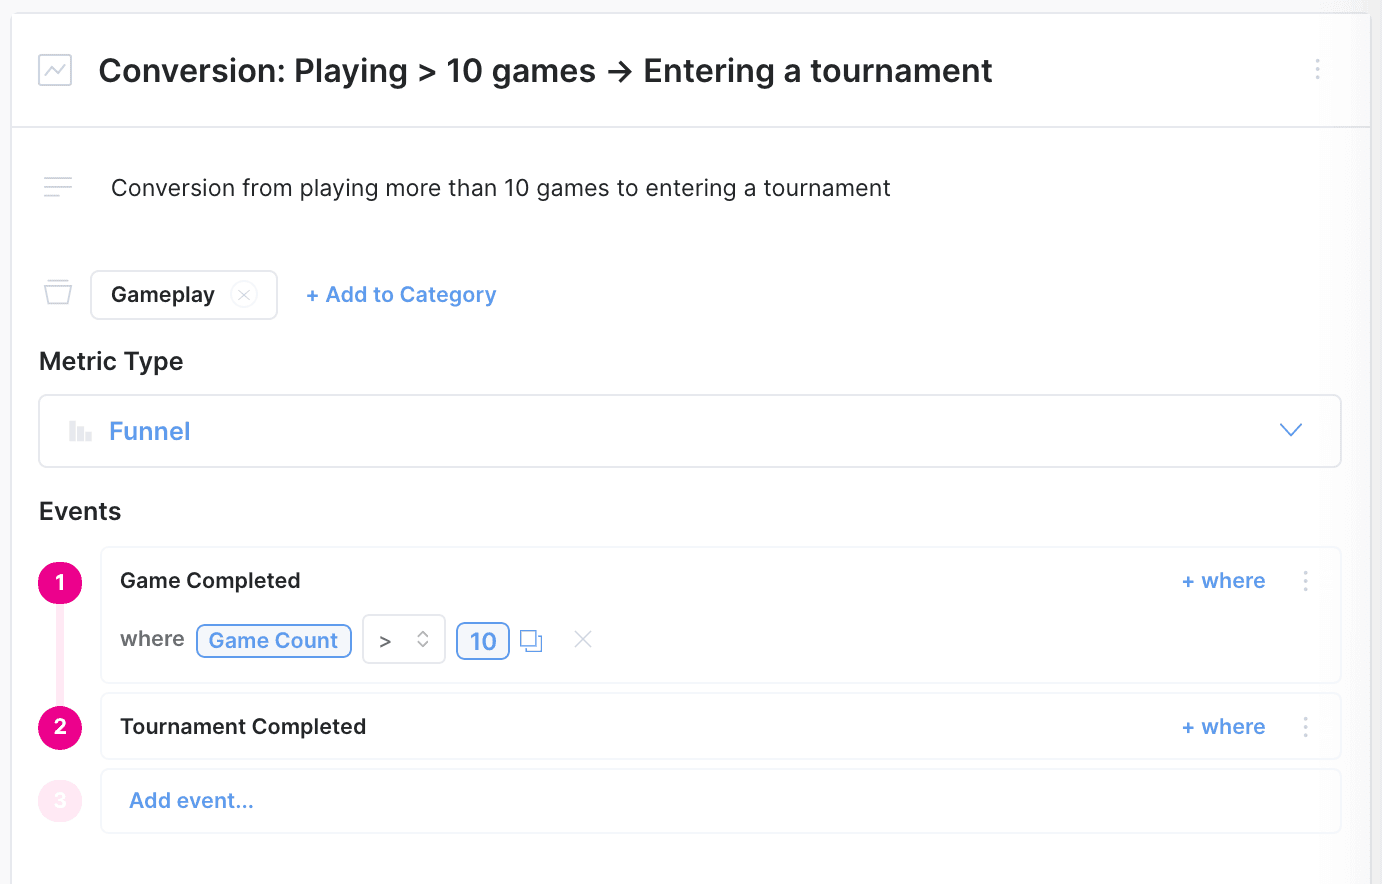
Example: Metric definition
Step 5 – Add your events
Finally you are ready to add your events and structure them the way you need to for your success metrics. You can do this from either the metrics view (to help you understand which properties you need to filter or segment by) or directly in the category view.
And here’s an example of the final result:
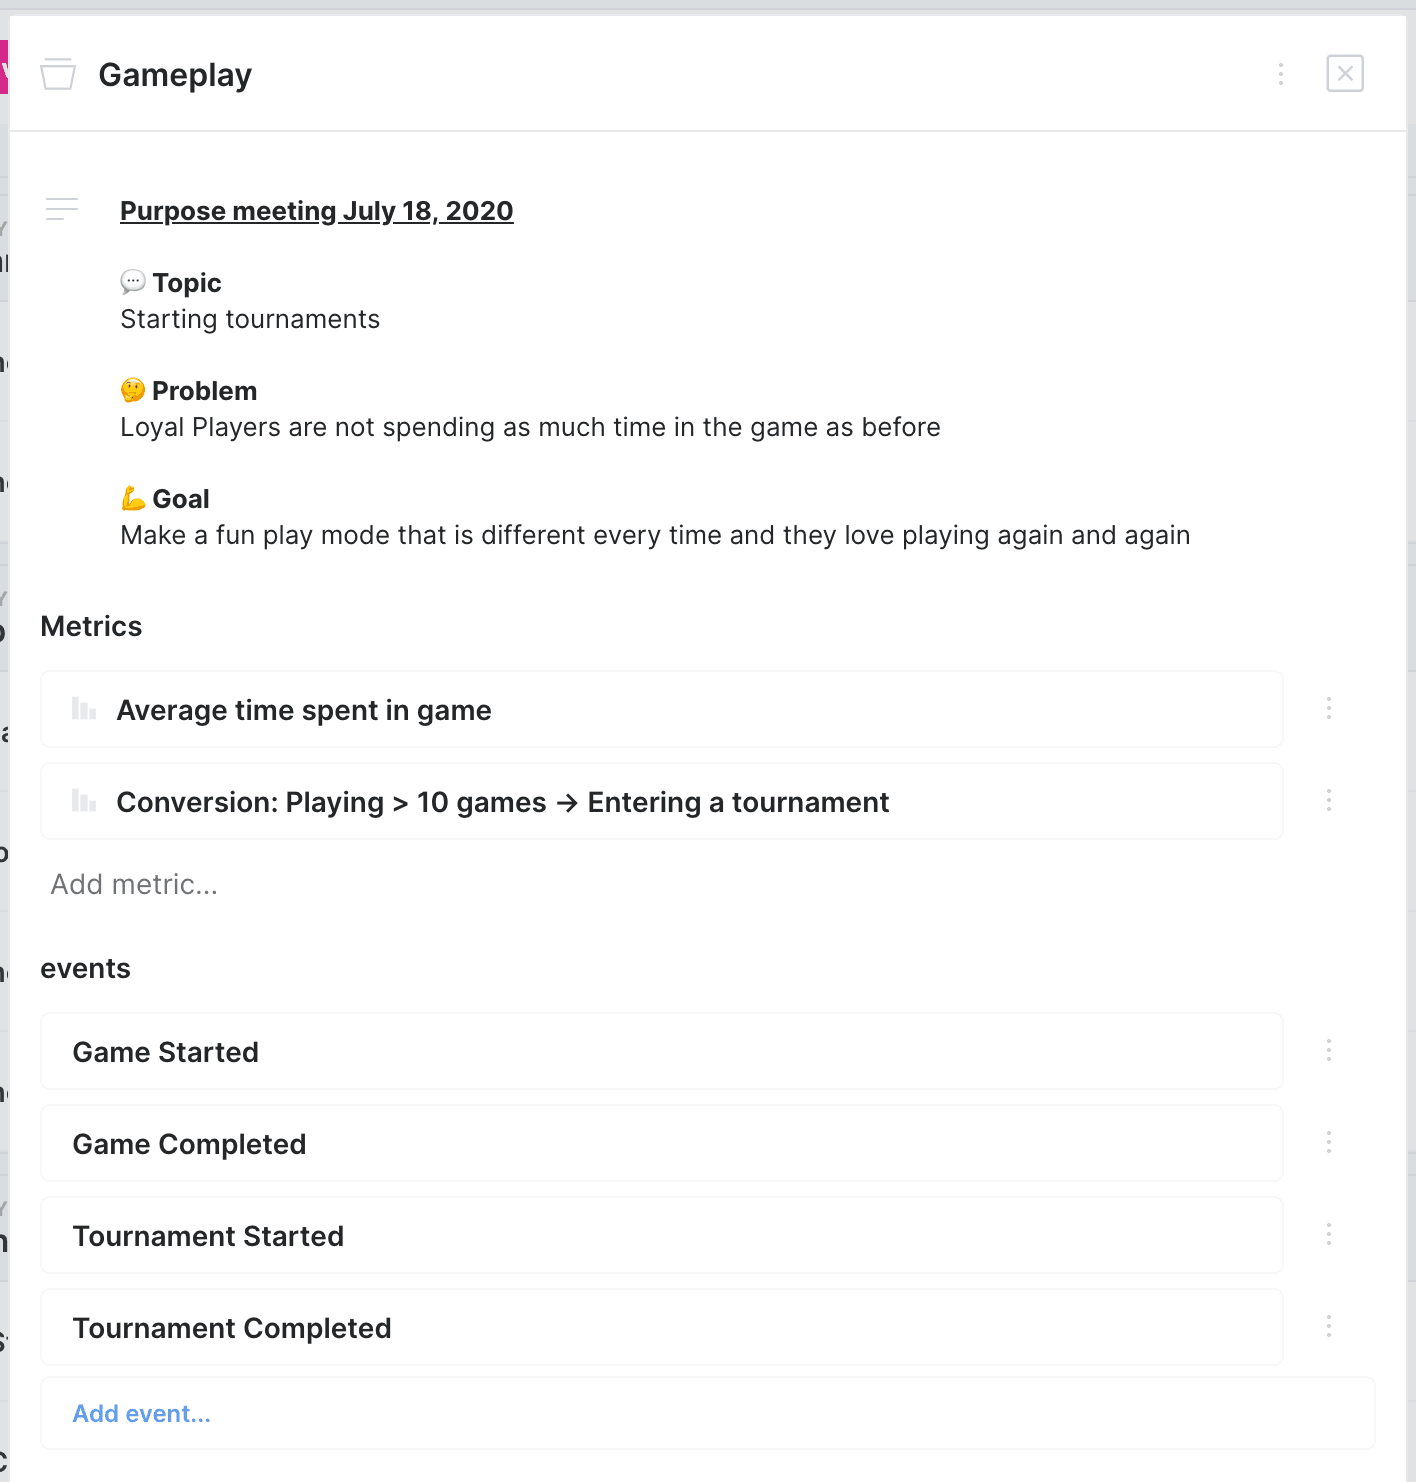
Example: Purpose meeting outcome
Thoroughly documenting your Purpose Meeting outcomes and conversations is one critical step in making sure your product and analytics data stands the test of time. Sure, it’s just another step in the pipeline now, but think how much easier it will be to onboard a new team member, or to iterate on analytic choices in the future. Your data quality will thank you!
With Avo you create this single source of truth to future-proof the insights in your product analytics to create reliable data now and tomorrow. Start using Avo today to create better data practices for tomorrow.