Quickstart: Branches
Seamlessly work together on multiple tracking plan updates using branches
What are branches?
In Avo you can collaborate in real time on defining, expanding and implementing your tracking plan. But you might want to try out some changes or make sure that a change is implemented before you change your tracking plan source of truth. To capture this work in progress you can use branches.
We highly recommend always creating a branch first before making changes to the tracking plan, no matter how small the changes are – in particular if the changes made require implementation. If changes are made directly on the main branch, then you risk someone else creating a branch that include your incomplete changes, which will very likely lead to conflicts in the future.
Creating a branch
To create a new branch, first make sure you are on the main branch. Click the branch name in the left side navigation bar and then click the “Create Branch” button.

Request branch review
When you’ve suggested changes to your tracking, mark the branch as ready for review, and assign an editor or admin to review the changes.

We recommend you set up Slack notifications for added visibility into tracking plan changes your team is making. You will also receive daily reminders of branches pending review.
When a branch is marked as Ready for Review (or later), it is locked for editing if your workspace has Protected main branch enabled. To make further changes, revert the branch to Draft—this will remove any existing approvals.
Review branch changes
To compare the changes drafted on a branch to the source of truth on the main branch, click the “View changes” button located next to your branch name at the top of the screen. On the Branch Changes screen, you can see the branch context, which parts of the tracking plan were added, deleted or updated and the code changes impacted by the tracking plan changes.

You can also filter the changes using the “Show changes since” dropdown to focus on recent modifications—for example, viewing only changes made since your last review rather than all changes since the branch was created.

How should branches be structured?
We recommend setting up branches that have isolated changes that can be opened, implemented and merged within a few days. Typically there’s a one to one mapping between Avo branches and git branches.
A branch often corresponds to a single journey for a feature or user flow, making it easy to design, review, and implement tracking changes together.
Like in git, we recommend against creating big branches with a backlog of events and properties to be implemented. We’d rather recommend splitting them in to manageable chunks that will be implemented together in a single git branch.
Closing a branch
Open the branch you want to close, click the triple-dot in the top right corner and click “Close branch”. Closing a branch hides it from the active branches list without permanently removing it, so its history remains available.

Renaming a branch
Open the branch, click View changes, select the Branch context tab, edit the branch name field, and save.
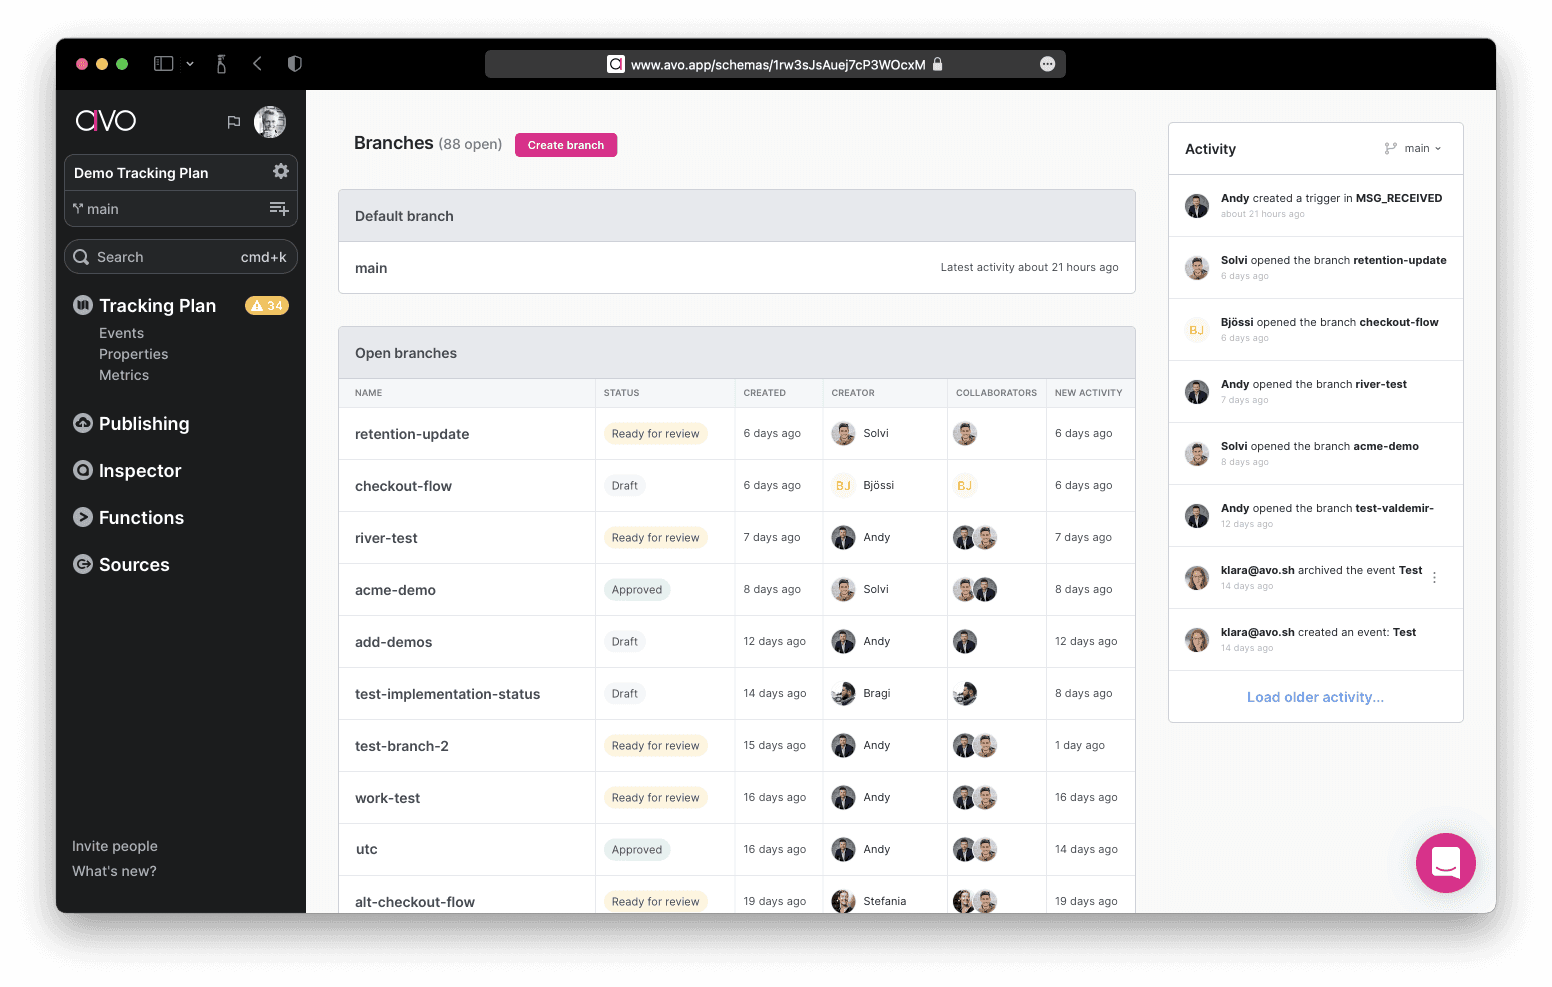
Branches Overview
Click the Avo logo in the top left of your workspace to navigate to the branches overview. There you will find info about all your open branches like it’s creator, the created date, the branch status, reviewers, collaborators and more. The branch overview helps you make sure no tracking plan changes are left behind and that you don’t miss out on progress that’s happening in your workspace.
Filtering branches
The branches overview provides powerful filtering capabilities to help you focus on relevant branches, especially in workspaces with many active branches:
Available filters:
- Branch Status: Filter branches by their current status (Draft, Ready for Review, Approved, Changes Requested, etc.)
- Impacted Stakeholders: Filter branches by stakeholder teams that are impacted by the branch changes
- Impacted Owners: Filter branches by stakeholder teams that own events being modified on the branch
Using branch filters effectively:
For status-based workflows:
- Use Branch Status filter to see branches at specific stages (e.g., all branches “Ready for Review” to see what needs attention)
- Filter by “Draft” to see work in progress, or “Approved” to see branches ready for implementation
- Combine with Impacted Owners to see status-specific branches affecting your team
For team-focused workflows:
- Use Impacted Owners filter to see branches that modify events your team owns and is responsible for
- Use Impacted Stakeholders filter to see branches that affect events your team depends on
- These filters help teams stay aware of changes that impact their domain without getting overwhelmed by unrelated branch activity
Combining filters for powerful workflows: You can combine multiple filters to create highly targeted views. For example:
- Stakeholder team leads: Filter by “Ready for Review” status AND your team as “Impacted Owners” to see all branches where your team’s approval is needed. This helps identify branches your team might be blocking and ensures nothing gets stuck waiting for your review.
Sharing filtered views: After applying filters, you can share the filtered URL with colleagues so they see the same focused view of branches.
What’s next?
- Journeys - Visually design analytics for a branch using product screenshots
- Approval workflows for branches
- Workbench
- Share implementation instructions for a branch
- Using Avo in parallel workflows for large development teams
- How to manage branches with multiple sources
- Designing data in Avo