Avo Codegen in Kotlin
This page documents the single-file Kotlin output. Avo can also emit Kotlin in a “library” shape that splits the runtime from per-source types — see Library codegen.
Platforms
Avo can code generate Avo Codegen in Kotlin targeted at the following platforms
- Android
- Kotlin Multiplatform (beta, advanced features like Codegen implementation status are coming soon)
- Server is coming soon, for now we recommend using the
Javagenerated code for backend JVM projects
Reach out if you want to use Avo Codegen in Kotlin server
You can force the Android generated code to use Kotlin Coroutines for the network calls with “—forceFeatures KotlinCoroutines” flag when running the Avo CLI. Let us know if you want to enable coroutines by default in your workspace.
Quickstart
Avo Codegen usage consists of 4 steps.
Step 1. Include the Avo file
Pull the generated code with the Avo CLI
To get the Avo generated Kotlin file you must be a member of an Avo workspace with a Kotlin source. Ask for an invite from a colleague or create a new workspace
npm install -g avo
avo login
avo pull --branch my-branch-nameLearn more about the CLI here.
You can also download the file manually from your Avo workspace.
Step 2. Initialize Avo
Initialize Avo by creating an object using constructor from the generated Avo file
val avo = AvoImpl(env = AvoEnv.DEV/*, other parameters depending on your tracking plan setup*/)The actual parameters depend on your tracking plan setup, see the parameters explanation in the reference below.
Step 3. Call Avo Codegen to track your product usage
Every event in your tracking plan, marked with the “Implement with Codegen” checkbox, gets a function in the generated code, named according to the event name, in camelCase.
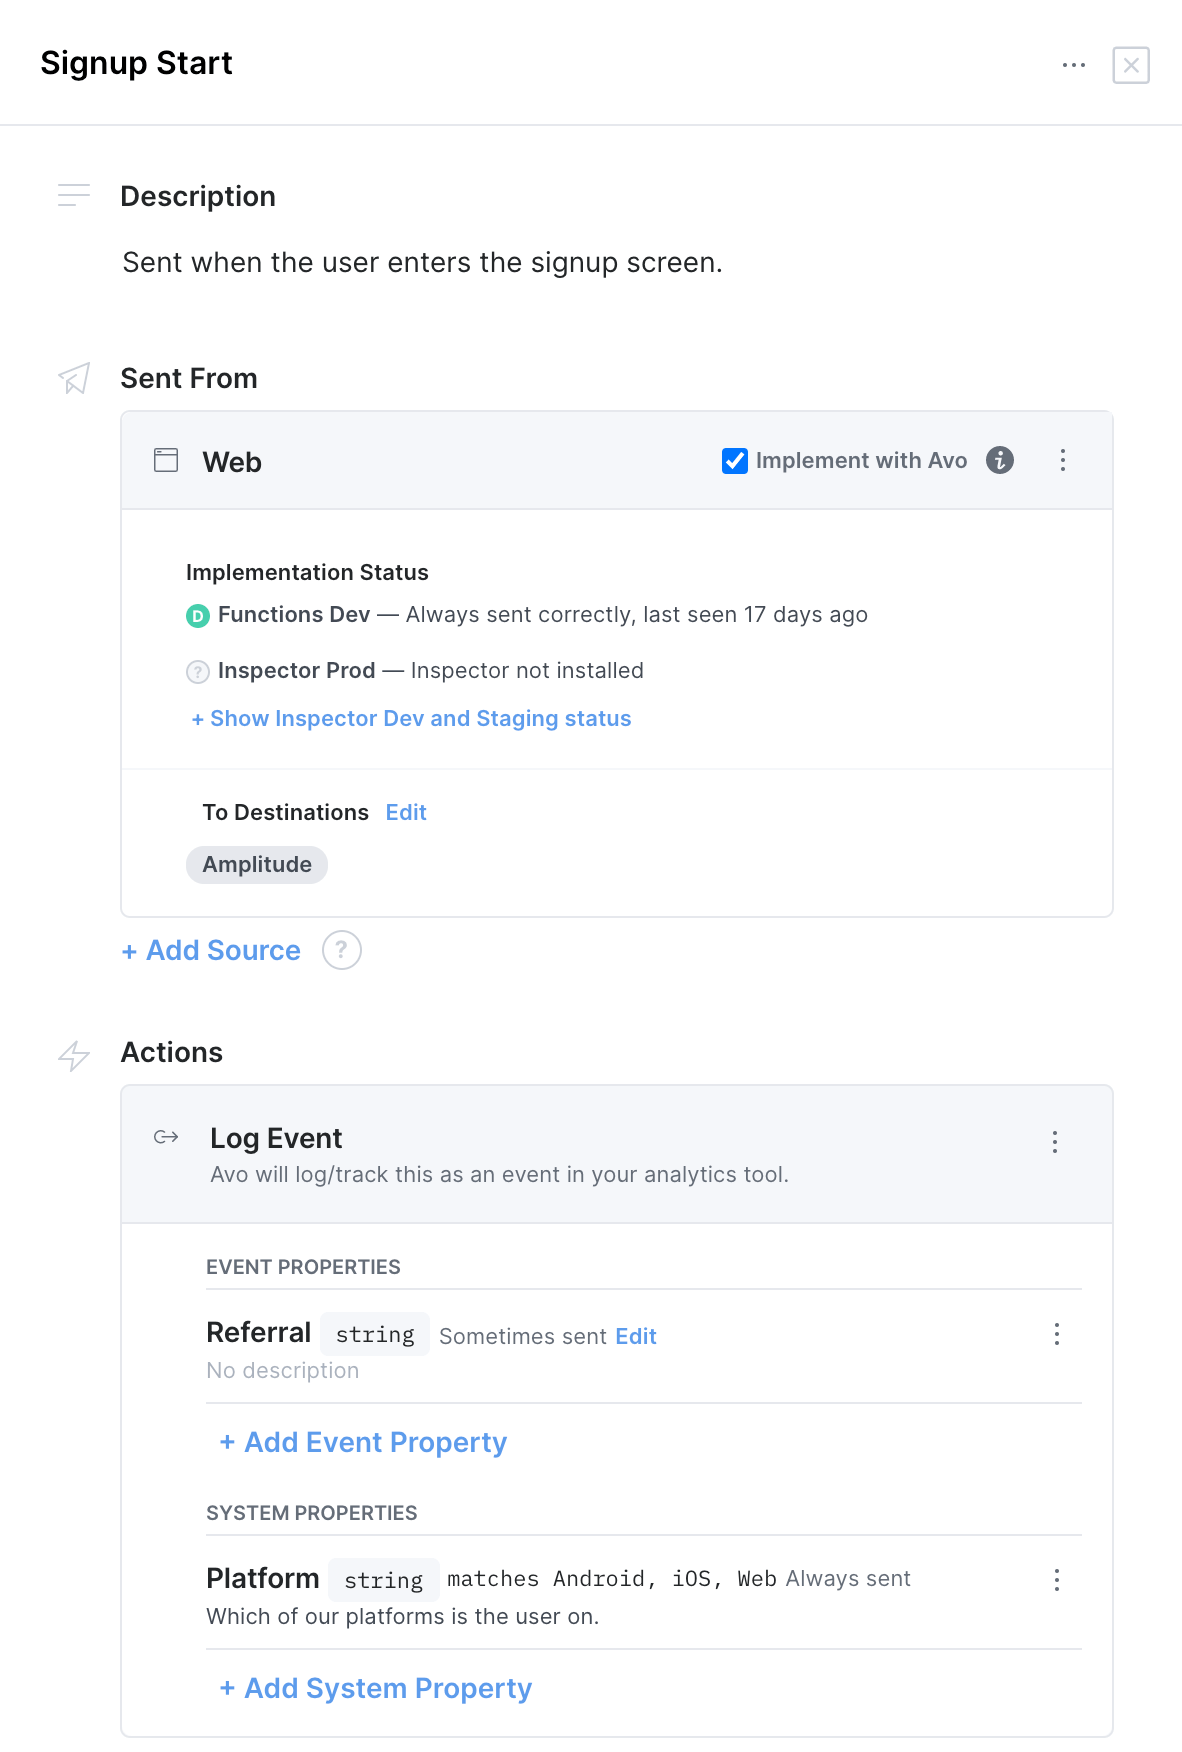
For example, if you have a “Signup Start” event defined like this in Avo:
You’ll be able to call it like this from the generated code
avo.signupStart(referral = "direct")Notice, that you are not passing the System property with the call. System properties are defined on the init step and then automatically included with all events. You can update the system properties with
setSystemPropertiesfunction.
Step 4. Verify the implementation
Use the Implementation status in your Avo workspace and the Avo Inspector to verify that your implementation is correct. If you don’t want to use Avo Inspector you can use the standalone visual debugger.
Reference
Constructor
class AvoImpl(env: AvoEnv,
    // Other parameters may not be present, depending on your tracking plan
    systemProperty0: int, systemProperty1: bool,
    mixpanelDestination: ICustomDestination,
    segmentDestination: ICustomDestination,
    otherDestination: ICustomDestination,
    avoInspector: Any? = null,
    strict: Boolean = true,
    application: Application, context: Context
)
Creates the Avo object that will be used to track.
This method will call the Make(env, apiKey) callback in all the provided destination interfaces. It will also initialize the analytics SDKs of the legacy Avo Managed destinations.
After initializing, call event functions on the avo instance:
avo.testEmptyEvent()We recommend using dependency injection to share the avo instance across your app. Frameworks like Hilt make it straightforward to provide and inject the AvoImpl instance wherever you need to track events.
Note:
AvoImplis the default generated class name for new workspaces, matching the workspace prefix. If you are using Kotlin Multiplatform (KMP, beta), you may see a different class name depending on your workspace configuration.
Legacy: Static pattern
Legacy workspaces use the static pattern, where you initialize and call events statically:
Avo.initAvo(application, context, AvoEnv.DEV/*, other parameters*/)
Avo.eventName(/*event properties*/)
Arguments
env: AvoEnv: Can be set to dev, prod and staging.
systemProperties: a number of parameters equal to the number of system properties defined in your Avo workspace.
The parameters are named the same as system properties, in camelCase, and require corresponding types: string, int, long, float, bool or list.
destination: ICustomDestination: object, each destination you are sending events to gets a separate parameter in the init function with callbacks that the Avo generated code will trigger, unless you are using the legacy Avo managed destinations. Each method in the destination interface is directly mapped to the Actions attached to each event in Avo. Learn more about event Actions in this doc.
interface ICustomDestination {
    fun make(env: AvoEnv, apiKey: String) {} // This method is optional, you can skip it if you've already initialized your Analytics SDK

    fun logEvent(eventName: String, eventProperties: Map<String, *>)

    fun logPage(pageName: String, eventProperties: Map<String, *>)

    fun revenue(amount: Double, eventProperties: Map<String, *>)

    fun setUserProperties(userId: String, userProperties: Map<String, *>)

    fun identify(userId: String)

    fun unidentify()
}
avoInspector: Any?: optional Avo Inspector instance. If you use Avo Inspector pass it here to make Avo Codegen automatically report the invocations to Avo Inspector.
strict: Boolean: bool, if true, Avo will throw an exception when it detects a tracking problem in development or staging. Note that the strict flag is ignored in production.
Destination interface example
// Example: Destination interface for the Mixpanel SDK. Replace the Mixpanel implementation with your own tracking SDK methods
let mixpanelDestinationInterface = object : ICustomDestination {
    var mixpanel: MixpanelAPI? = null
        private set

    override fun make(env: AvoEnv, apiKey: String) {
        mixpanel = MixpanelAPI.getInstance(context.applicationContext, apiKey)
    }

    override fun logEvent(eventName: String, eventProperties: Map<String, *>) {
        mixpanel?.track(eventName, eventProperties)
    }

    override fun setUserProperties(userId: String, userProperties: Map<String, *) {
        mixpanel?.people?.set(userProperties)
    }

    override fun logPage(pageName: String, eventProperties: MutableMap<String, *>) {
        // Note: In this example the Mixpanel SDK does not provide a native method for page or screen tracking, so we send an event instead. Other SDKs may have a dedicated page tracking method.
        let mutableEventprops = eventProperties.toMutableMap()
        mutableEventprops["Page Name"] = pageName
        mixpanel?.track("Page Viewed", mutableEventprops)
    }

    override fun revenue(amount: Double, eventProperties: Map<String, *>) {
        mixpanel?.people?.trackCharge(amount, eventProperties)
    }

    override fun identify(userId: String) {
        mixpanel?.identify(userId)
    }

    override fun unidentify() {
        mixpanel?.reset()
    }
}
Read more about the destination interface here.
Additional arguments
application: Application and context: Context are required by some analytics destinations.
setAvoLogger
fun setAvoLogger(logger: (String) -> Unit)This method allows you to provide custom implementation of the logger used by Avo Codegen. Can for example be used to disable logs or change which logging method is used.
Arguments
avoLogger: (String) -> Unit: custom implementation of the logger, e.g. { logMessage: String -> Log.d(this.localClassName, logMessage) }
setSystemProperties
fun setSystemProperties(systemProperty0: Int, systemProperty1: Boolean?, ...)A method to update system properties after initialization.
Arguments
systemProperties: a number of parameters equal to the number of system properties defined in your Avo workspace.
The parameters are named the same as system properties, in camelCase, and require corresponding types: string, int, long, float, bool or list.
Event tracking functions
fun [yourEventName](eventProperty0: Int, eventProperty1: Double?, ..., userProperty0: Boolean?, userProperty1: List<Int>, ..., userId_: String)Every event you define in your tracking plan in Avo gets a function named after the event in camelCase. The arguments of the function depend on how it’s defined in your tracking plan
Arguments
eventProperty: type defined in the Avo tracking plan, can be string, int, long, float, bool and list:
Every event property attached to the event in the Avo UI gets a corresponding argument. The argument key is camelCase version of the property name.
Pass the value of the property to track here.
userProperty: type defined in the Avo tracking plan as a user property, can be string, int, long, float, bool and list:
Every user property attached to the event in the Avo UI gets a corresponding argument. The argument key is camelCase version of the property name.
Pass the value of the property to update here.
userId_: String: used to connect event to specific user.
Added if the event has the Identify User action
Snowplow interface
Snowplow SDK’s tracking interface is a little different from the common event tracking libraries and working with Snowplow through Avo is slightly different too.
If you add a snowplow destination to a Kotlin source you’ll get an additional constructor parameter
snowplowDestination: AvoSnowplowDestinationYou’ll implement it like this:
val avo = AvoImpl(...,
    snowplowDestination = object : AvoSnowplowDestination {
        override fun make(env: AvoEnv) {
            // Optional: You can initialize Snowplow here or leave empty if initialized elsewhere.
            // Your custom Snowplow initialization, that includes the `createTracker` call
            // Snowplow.createTracker(this@MainActivity, "appTracker", "COLLECTOR_URL", HttpMethod.POST)
            // Learn more: https://docs.snowplow.io/docs/sources/mobile-trackers/installation-and-set-up/?platform=android
        }

        override fun trackSelfDescribingEvent(schema: String, data: Map<String, *>, contexts: List<Map<String, Any>>) {
            val eventContent = SelfDescribingJson(schema, data)

            val event = SelfDescribing(eventContent)
            contexts.forEach { customContext ->
                val contextSchema = customContext["schema"]
                val contextData = customContext["data"]
                if (contextSchema is String && contextData is Any) {
                    event.customContexts.add(
                            SelfDescribingJson(contextSchema, contextData)
                    )
                }
            }

            Snowplow.getDefaultTracker()?.track(event)
            // Learn more: https://docs.snowplow.io/docs/sources/mobile-trackers/installation-and-set-up/?platform=android
        }

        override fun trackPageView(title: String) {
            Snowplow.getDefaultTracker()?.track(ScreenView(title))
            // Learn more: https://docs.snowplow.io/docs/sources/mobile-trackers/installation-and-set-up/?platform=android
        }

        override fun identify(userId: String) {
            Snowplow.getDefaultTracker()?.subject?.userId = userId
            // Learn more: https://docs.snowplow.io/docs/sources/mobile-trackers/installation-and-set-up/?platform=android
        }

        override fun unidentify() {
            Snowplow.getDefaultTracker()?.subject?.userId = null
            // Learn more: https://docs.snowplow.io/docs/sources/mobile-trackers/installation-and-set-up/?platform=android
        }
    })
Destinations
You can send your data using the Avo generated Kotlin code to any data destination that accepts custom events, including:
- Amplitude
- FacebookAnalytics
- FullStory
- Mixpanel
- Mixpanel
- Permutive
- Segment
- Snowplow
- ZendeskConnect
- Adobe Analytics
- Apptelemetry
- RudderStack
- Freshpaint
- PostHog
- Google Analytics 4 / Firebase Analytics
- Heap
- Keen
- Kissmetrics
- LaunchDarkly Events
- Pendo
- Fivetran
- AppsFlyer
- Braze
- Intercom
- A home made SDK
- Internal API