Sources
If you open the “Sources” tab in your Avo workspace you’ll find yourself in a place to define and configure sources and destinations.

Sources and destinations are an important part of your tracking plan, and crucial for implementation, so we recommend maintaining an up-to-date list of them and attaching relevant sources and destinations to events. If you use Avo Codegen the same data is used to generate the tracking code. If you use Inspector, the sources represent the products/platforms where you install Inspector
Sources
The sources are code bases that you send events from and install Inspector, for example your website, mobile application or your server.
In the tracking plan, the sources help you understand what app is sending particular events and they will also help you to locate a subset of changes to give to the platform developers to implement. Either using the “Copy instructions for developers” (on adoption steps 1 and 2) or the generated code (on adoption step 3) Avo will automatically select relevant changes for a particular platform and will help the developer to orient in the tracking plan.
Creating a source
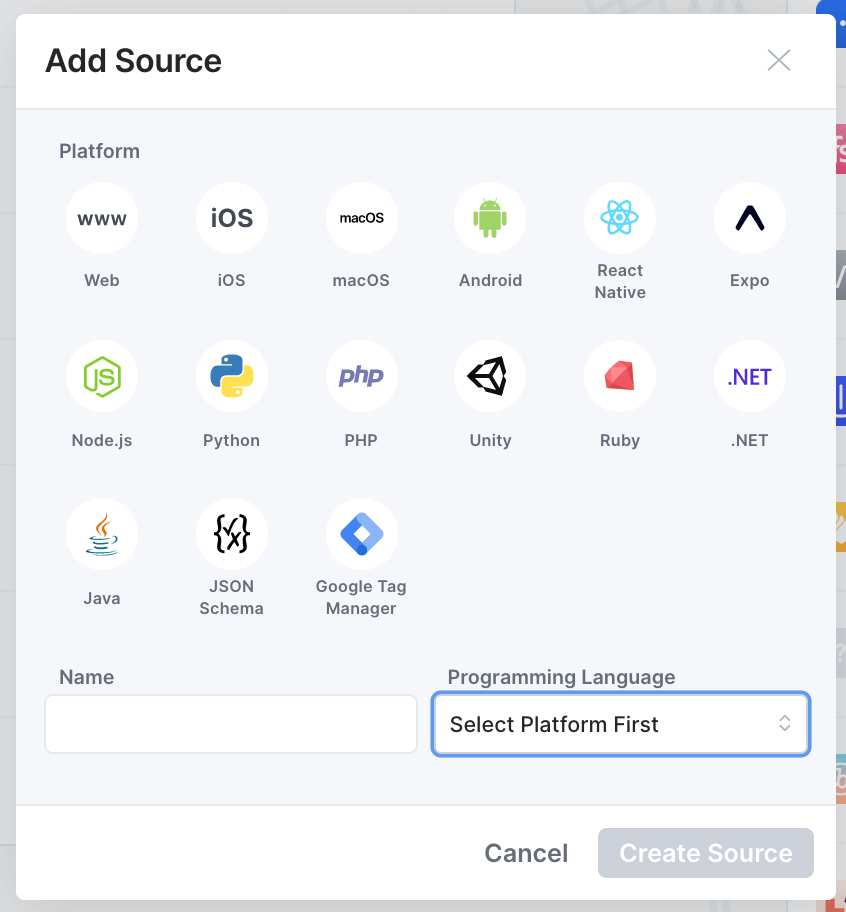
To create a source press “Add Source” button in the “Sources” tab.

Then you’ll see a configuration dialog, define necessary config and press “Create Source”.
Overview
The overview section of the source setup contains the base configurations for the source.
Name
We recommend naming your source in a manner that is easy for anyone to understand what part of your product it refers to.
For single product organizations we normally recommend creating sources representing each git repository that events should be sent from – and naming them accordingly.
- If you have a single repository per development platform then your sources could be named something like
- “Web”
- “Mobile” (if using React Native)
- “iOS” and “Android” (if using iOS and Android native platforms)
- “Backend”
- If you have multiple repositories for some of your development platforms, we recommend creating a source for each of them. For example if you have your backend split into micro-services your sources could be named something like:
- Backend – Authentication
- Backend – Payment
- Backend – Notifications
For multi product organizations we normally recommend creating a source per product per development platform. So that they will be named something like:
- Product A – Web
- Product A – Mobile
- Product A – Backend
- Product B – Web
- Product B – Mobile
- Product B – Backend
- …
Read more about organizing multi-product workspaces .
Development platform
The development platform you select for your source indicates whether it’s a web, desktop, mobile, backend or a game engine source and what kind. Below is a list of supported development platforms:
- Web
- Desktop
- MacOS
- Mobile
- iOS
- Android
- React Native
- Expo
- Backend
- Node.JS
- Python
- PHP
- Ruby
- .NET
- Java
- Game Engines
- Unity
You don’t have to define the programming language unless you want to set up and use Avo Codegen to implement your tracking. Read more about supported and upcoming programming languages here.
Destinations
The destinations are the other end of the source <-> destination pair. You can configure which destinations should be connected to this source in the source details.
To enable or disable a destination globally for a source, you can click the source name in the “Sources” tab it will open the source details. There you can pick the destinations you want this source to send data to.
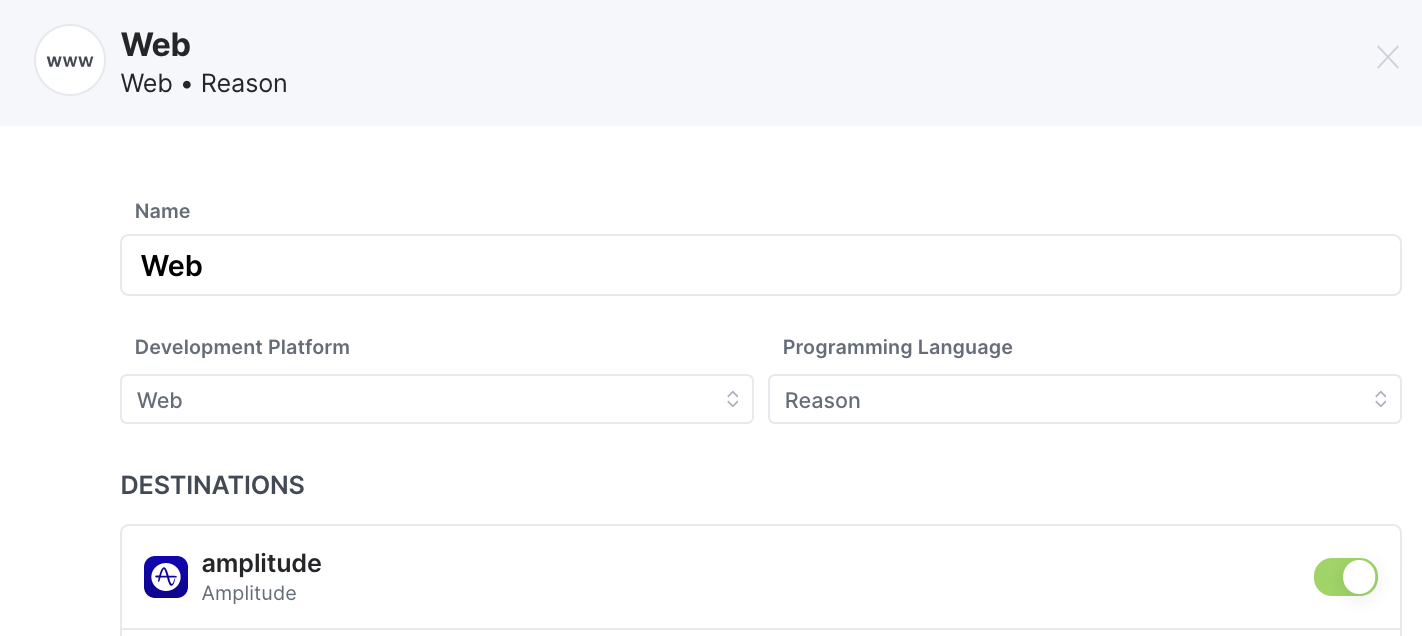
Think “Our web app sends data to Amplitude”.
This can also be configured in the destination details, where sources can be toggled on and off.
Events
The events list in the source overview shows all the events that the source is currently attached to and whether the events should be implemented with Avo or not.
If an event is in this list, it means that the event is or should be sent from this source.
If the “Implement with Codegen” check mark is checked, it means that the event should be implemented using Avo Codegen that is generated based on the event definition in the tracking plan. If the check mark is not checked, it means that the event should be implemented using existing implementation methods, probably a direct call to the analytics SDK.
When creating an event we recommend to add it to all the existing sources where it should be sent from, whether you are using Codegen or existing implementation methods to implement. This information is both used by Codegen to automatically create the tracking code if you are using Codegen and to generate implementation instructions for a developer.
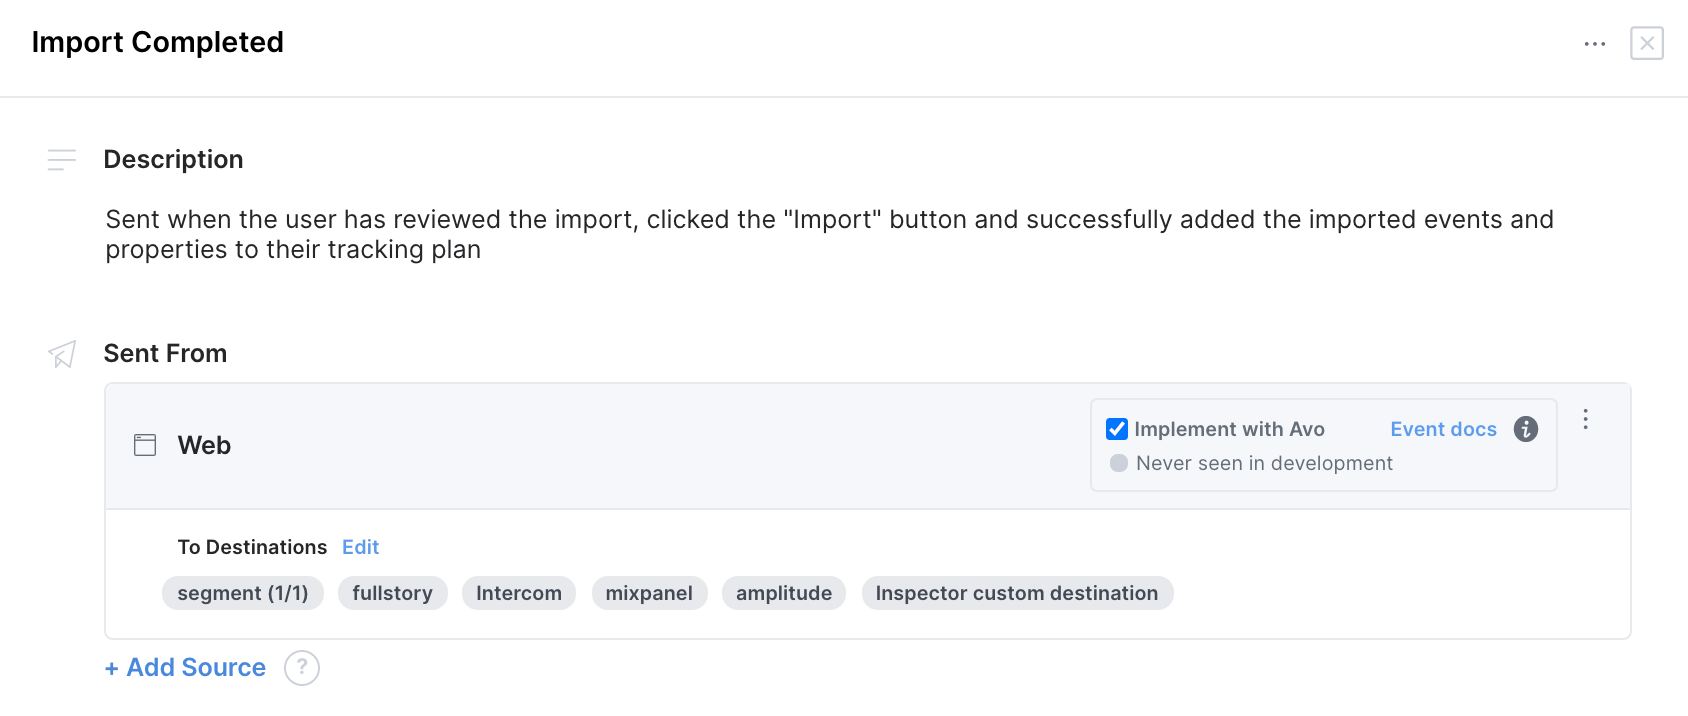
Think “Import Completed event is sent from our web site”.
To add or remove events event to/from the events list on this source, first click “edit”
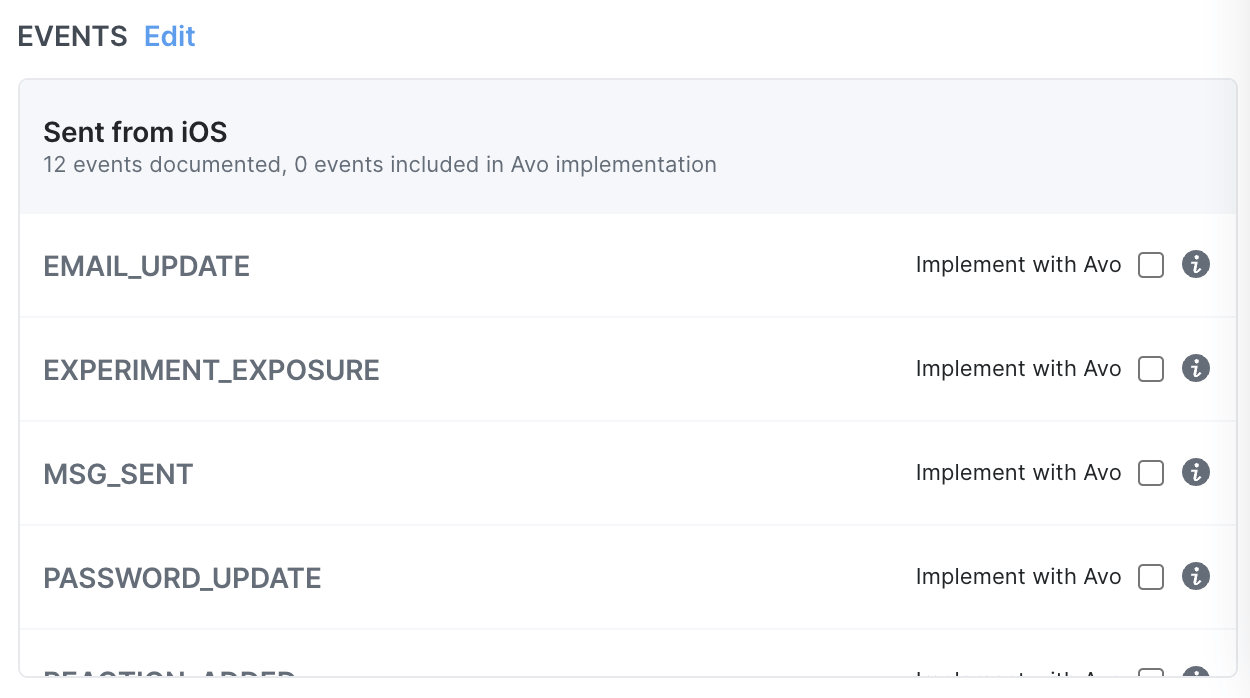
and then check or uncheck the events you want to add/remove on the modal that appears.
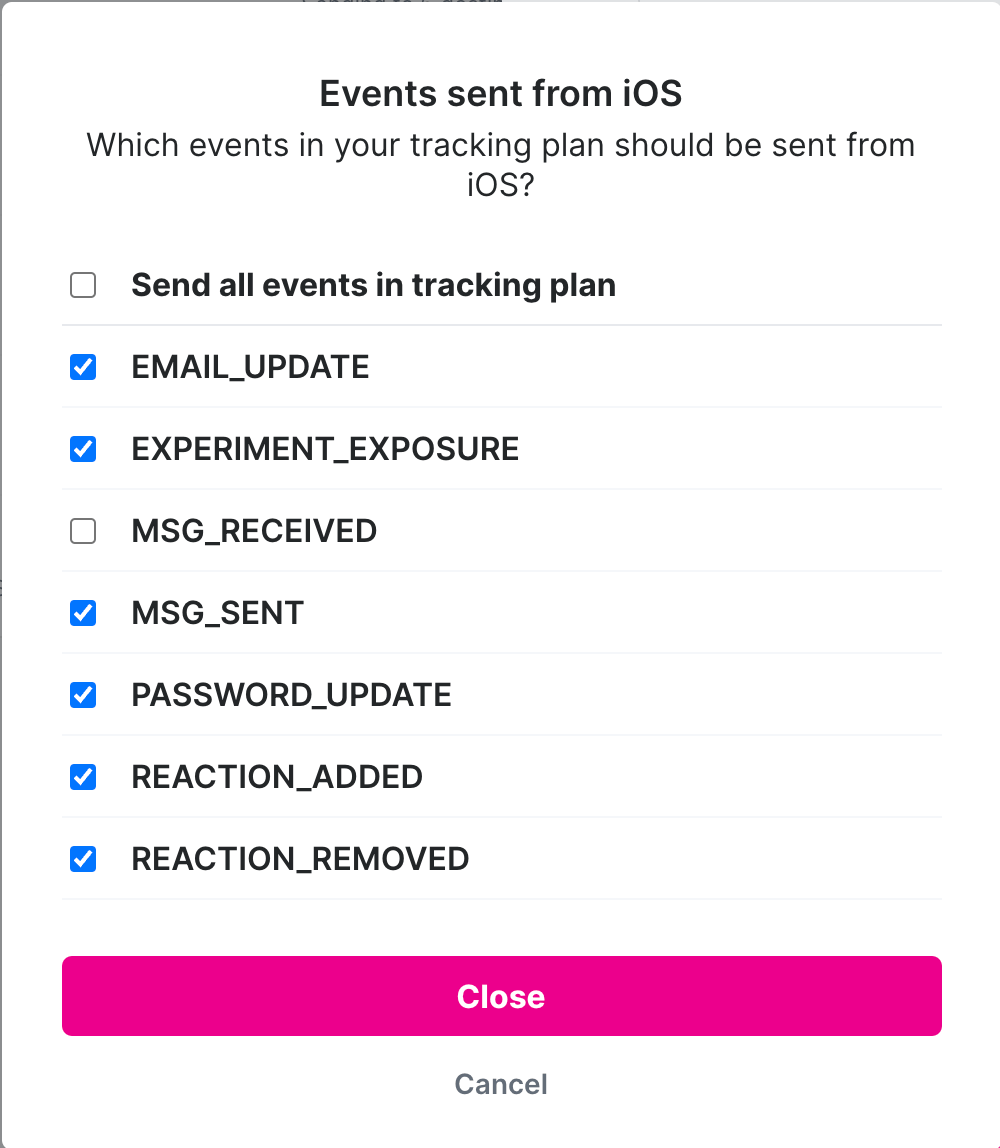
This is a really convenient way to bulk add or remove a source to multiple events, instead of having to go into each event details to add or remove the source.
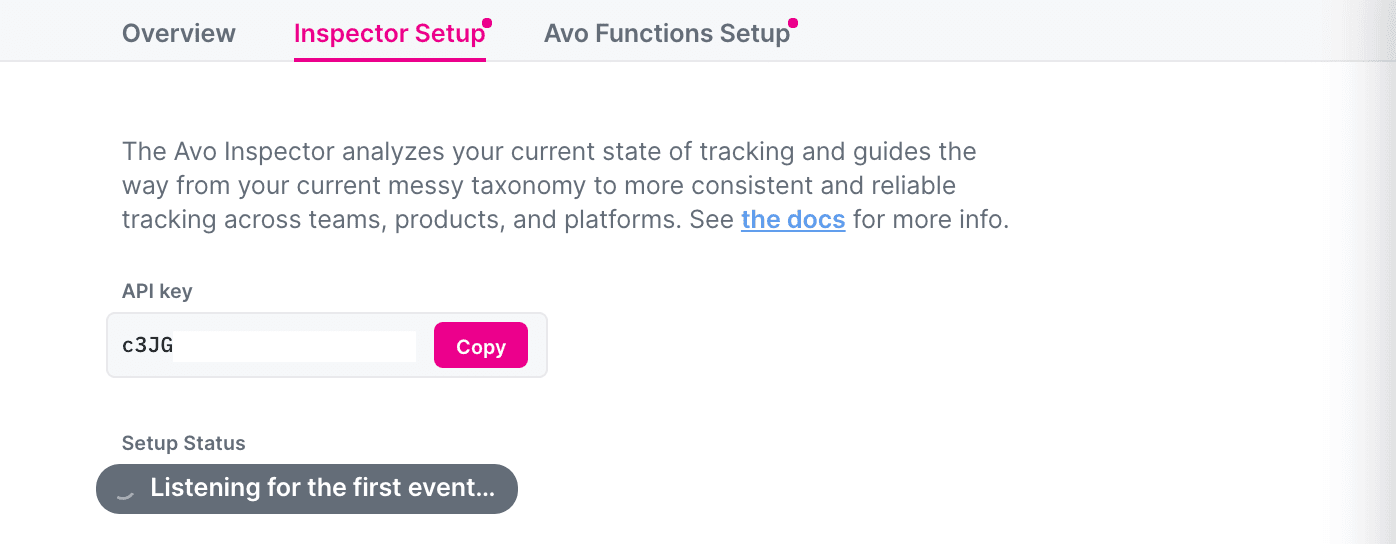
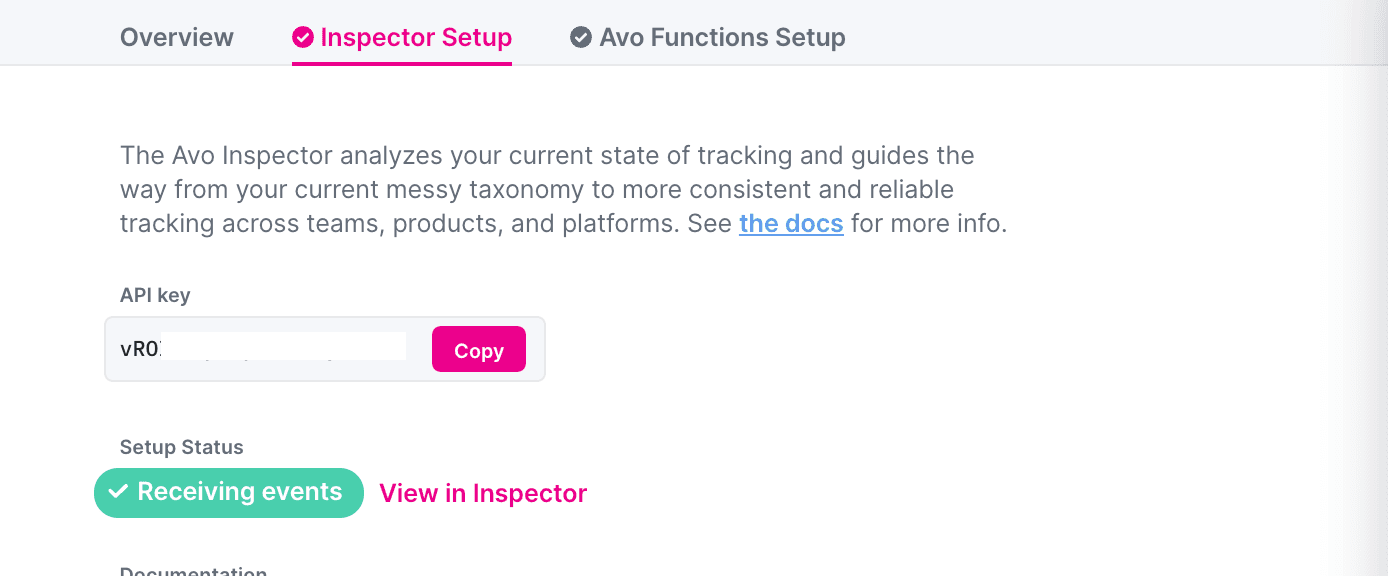
Inspector Setup
Inspector Setup part of the source details contains an overview of how to set up Inspector for this source for the first time and the API key needed to be able to start sending data.
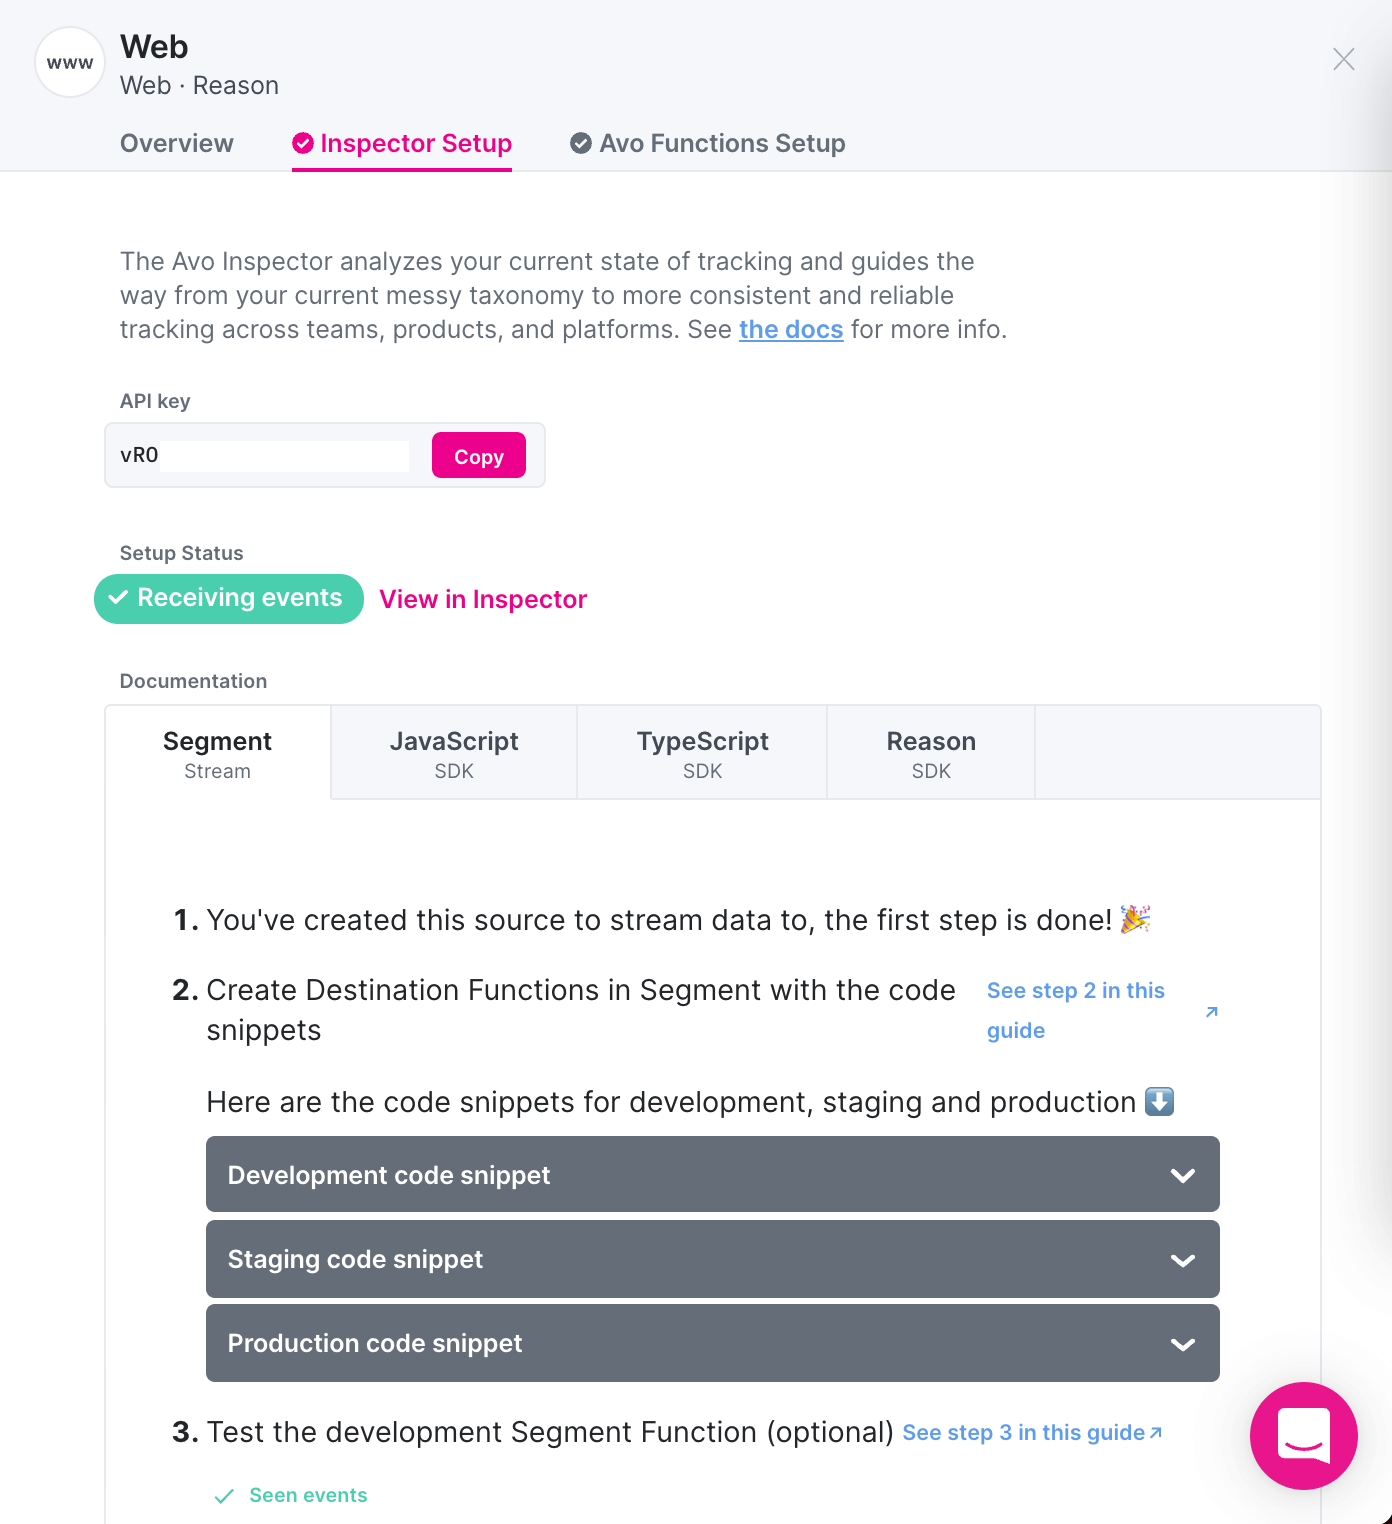
API Key
This is your API key that is unique for each source. Follow the documentation in the section below to see where to paste it in your code.
Setup Status
The setup status indicates whether Inspector is receiving events or not. If it has yet to be installed with the API key for this source, the setup status will show “Listening for the first event…”
Once you have successfully installed Inspector, the setup status will show “Receiving Events” and a link to see them in Inspector dashboard.
Documentation
The documentation is automatically generated instructions with code snippets on how to install Inspector using either Segment functions or directly for your programming language.
Check out the Tracking Observability part of this documentation to learn more on how to set up Inspector.
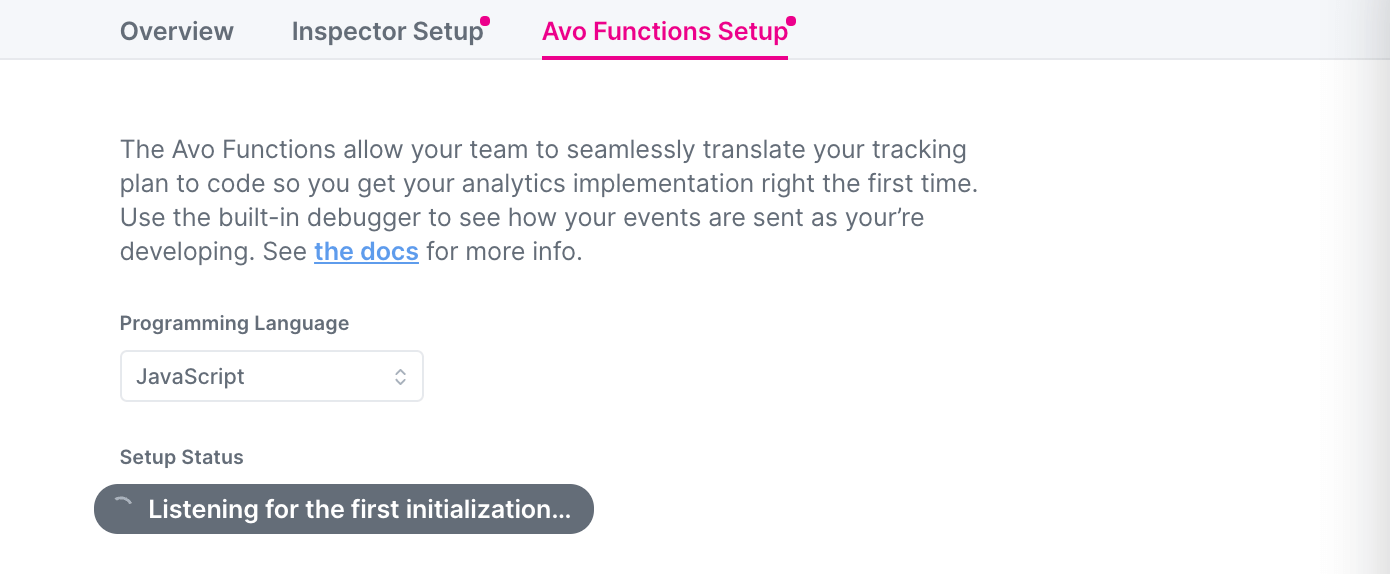
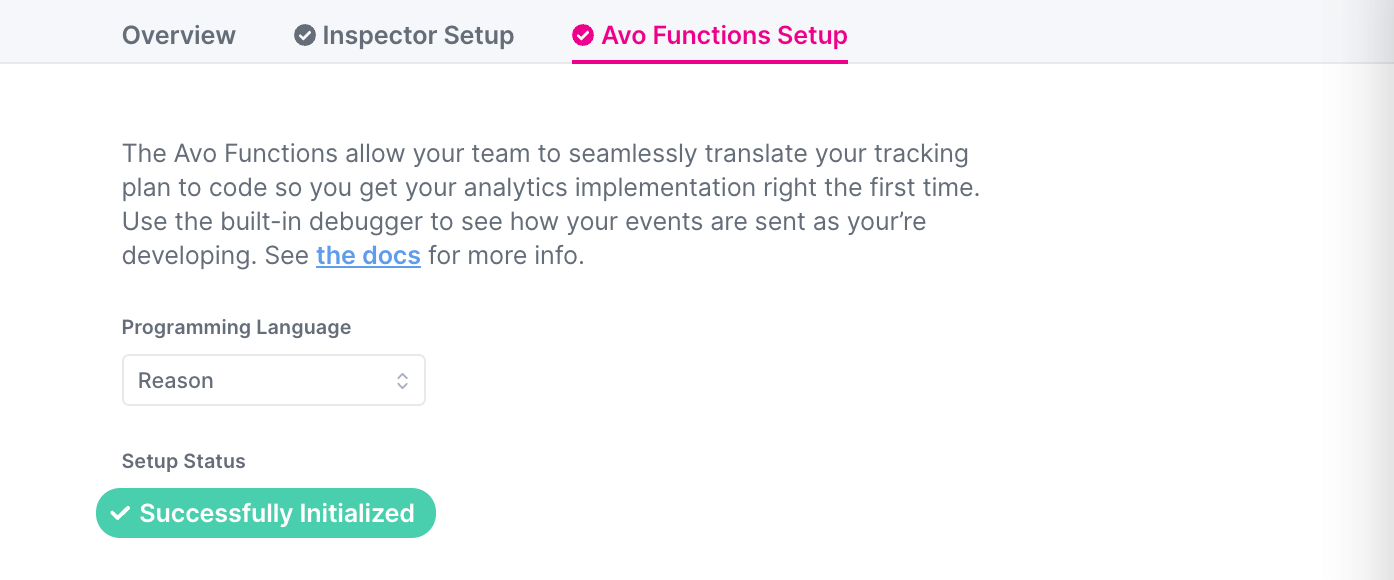
Avo Codegen Setup
The Codegen Setup part of the source details contains a step by step guide on how to set up and Initialize Avo function for this source for the first time.
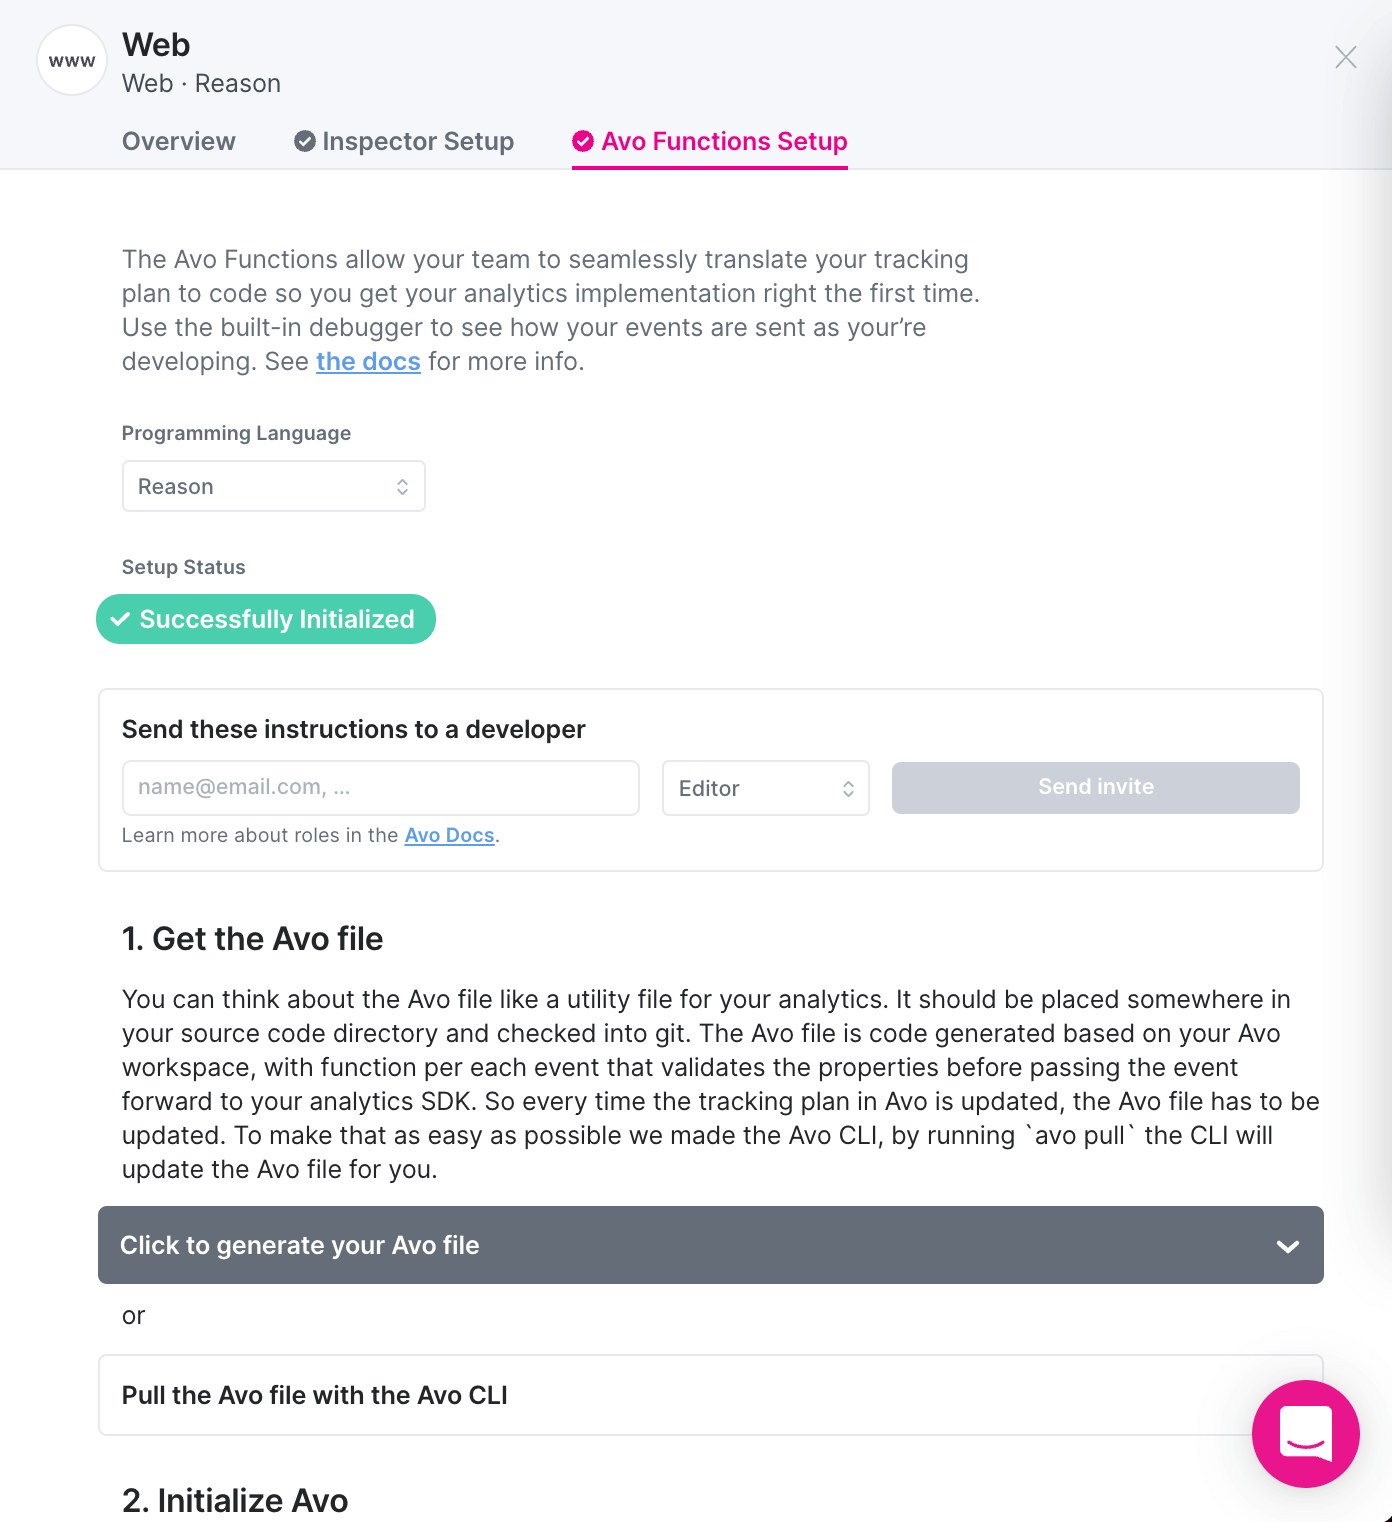
Programming Language
To start using Codegen for this source, you need to select which programming languages here you want to generate the code in.
Setup Status
The setup status indicates whether Codegen has been successfully initialized or not. If they have yet to be Initialized for this source, the setup status will show “Listening for the first initialization…”
Once you have successfully initialized Codegen, the setup status will show “Successfully Initialized”, which means you can start implementing events using Codegen.
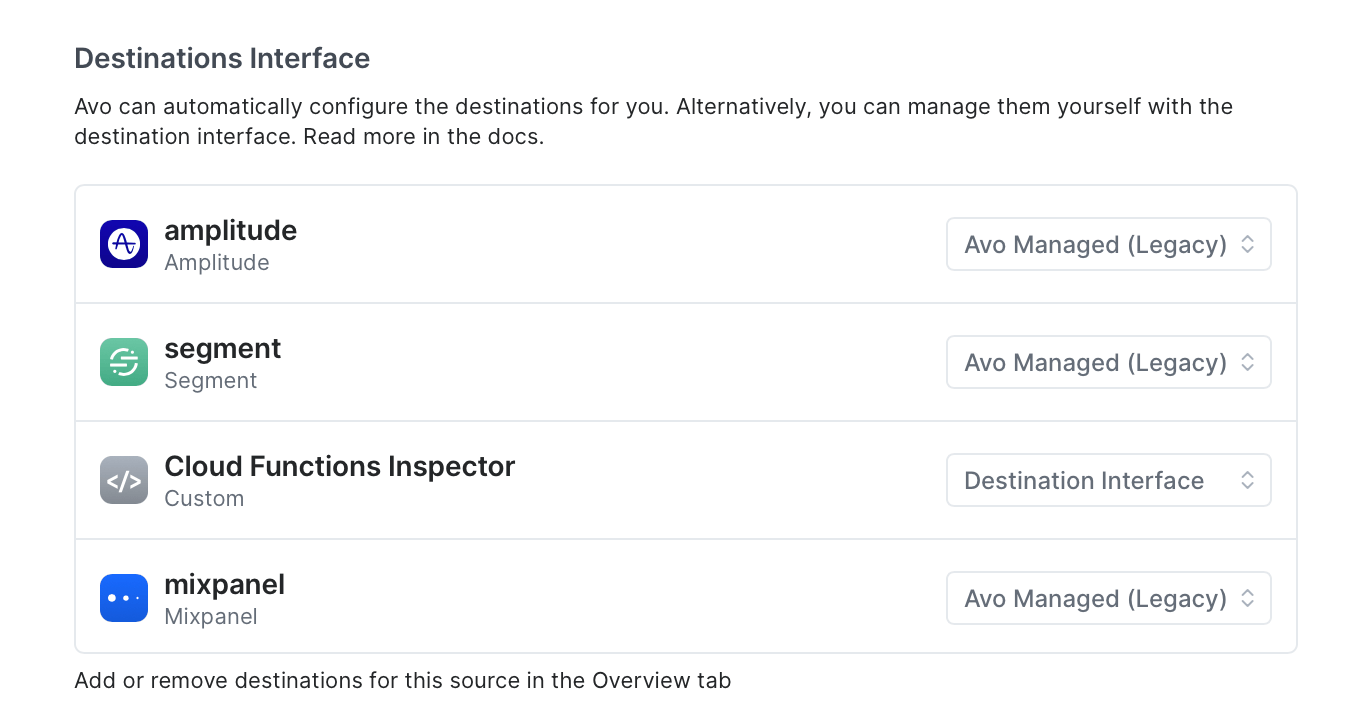
Destination Interface
Destinations can have two modes: Destination Interface and Avo Managed:
- When set to Destination Interface (recommended), Avo will provide a set of callback methods to connect your existing analytics destination to your Avo instance.
- When set to Avo Managed, Avo will manage the destination for you, that includes initializing it and passing all data you send via Avo to relevant destination calls. Note that in Avo Managed mode you can’t use your destination SDK outside of Avo, e.g. for existing tracking.
Learn more about Destination Interface and Avo Managed destinations in the Destinations in Codegen doc .
Documentation
The documentation is automatically generated for your source and the connected destinations. First you have to generate your Avo file by using our CLI or downloading it from the UI, then you can initialize Avo and implement your events.
Check out the Type Safe Code, unit tests and CI part of this documentation to learn more on how to set up Codegen.
Destinations
Destinations are analytics platforms you send events to.
In Avo you can use any event-based analytics destination.
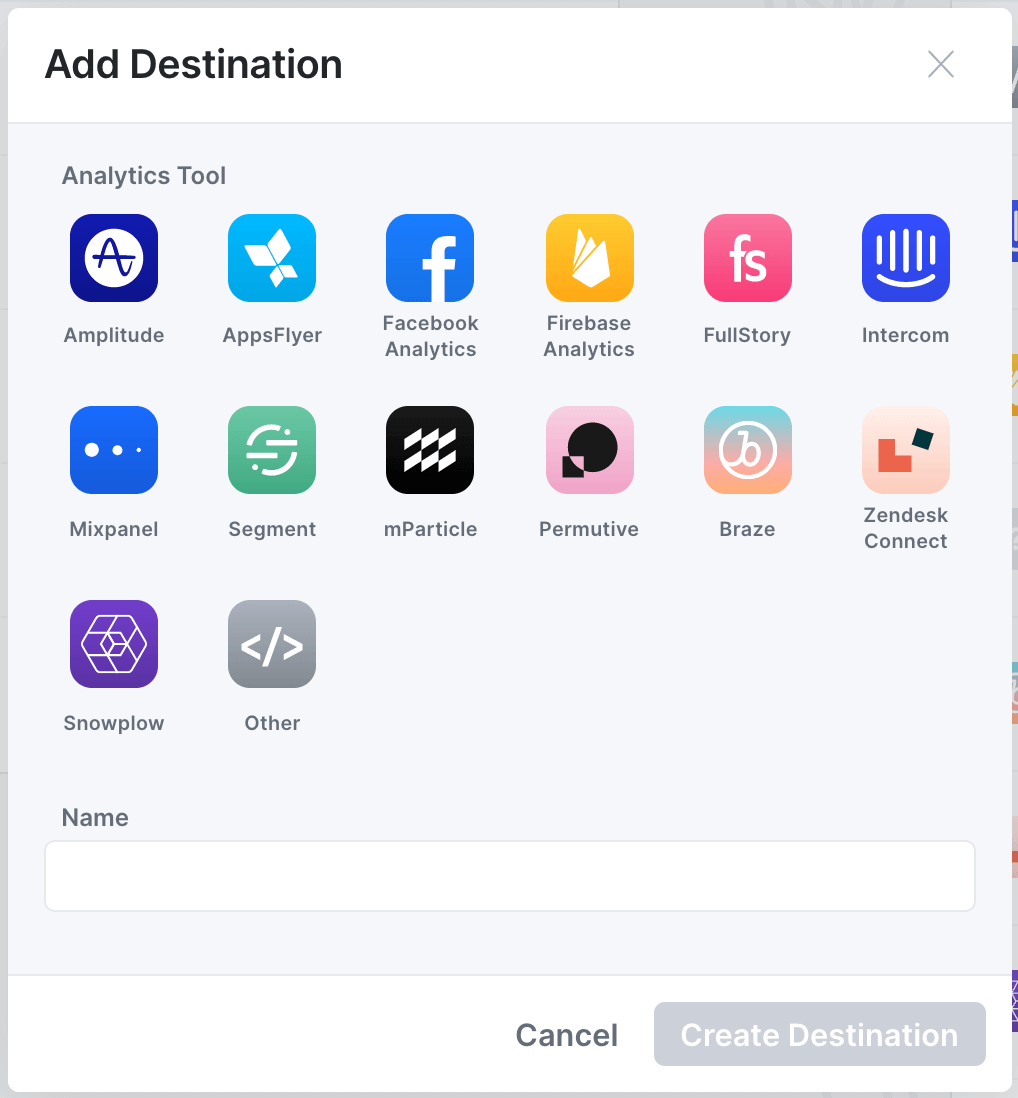
Creating a destination
To create a destination press “Add Destination” button in the “Sources” tab

Then you’ll see a configuration dialog, define necessary config and press “Create Destination”
Can’t find your analytics tool in the list of available destinations? In that case you can pick the “Custom” destination type and give a descriptive name.
Managing destinations in the tracking plan
What destinations you send your events to is always defined on the source level and can also be configured per event for each source.
** Globally per source **
To enable or disable a destination globally for a source, you can click the source name in the “Sources” tab it will open the source details. There you can pick the destinations you want this source to send data to.
Think “Our web app sends data to Amplitude”.
This can also be configured in the destination details, where sources can be toggled on and off.
** Locally per event per source **
To enable or disable a destination locally on an event for a specific source, you can find your event in the tracking plan, open it and find your source in the event details and click “edit” in the “To Destinations” part. There you can toggle specific destinations on or off.
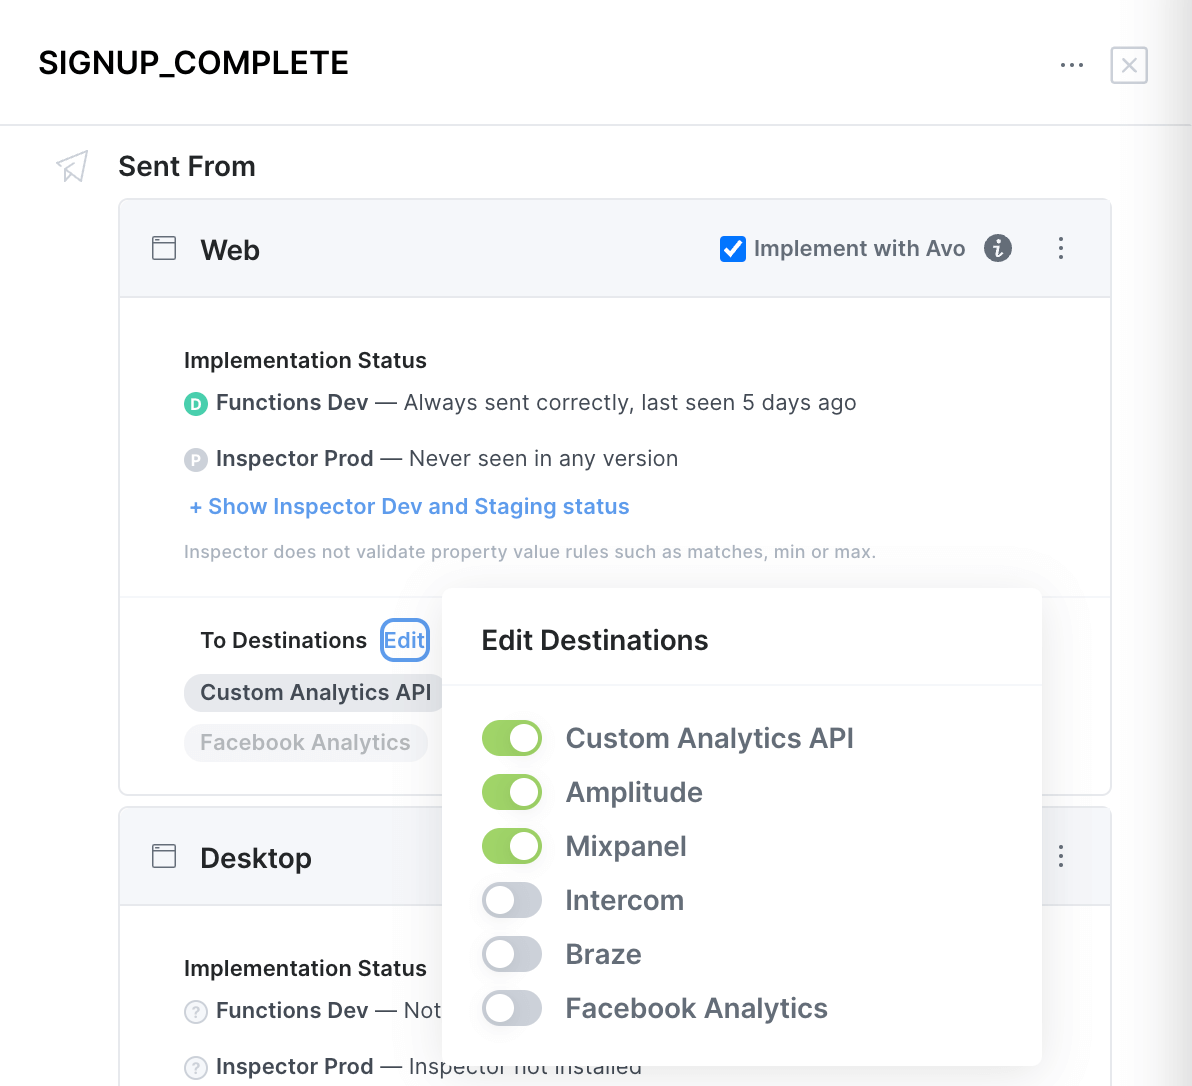
Think “We send the Signup Complete event from web and send it to our Custom Analytics API, Mixpanel and Amplitude – not our other destinations.”
What’s next?
Now you know how to define and configure sources and destinations in Avo. Next thing to learn is the branched workflows.